Quick start in three steps
The setup assistant takes you from the empty map to the finished 3D hunting ground. You can start right away; you only need an account once you want to save your ground.
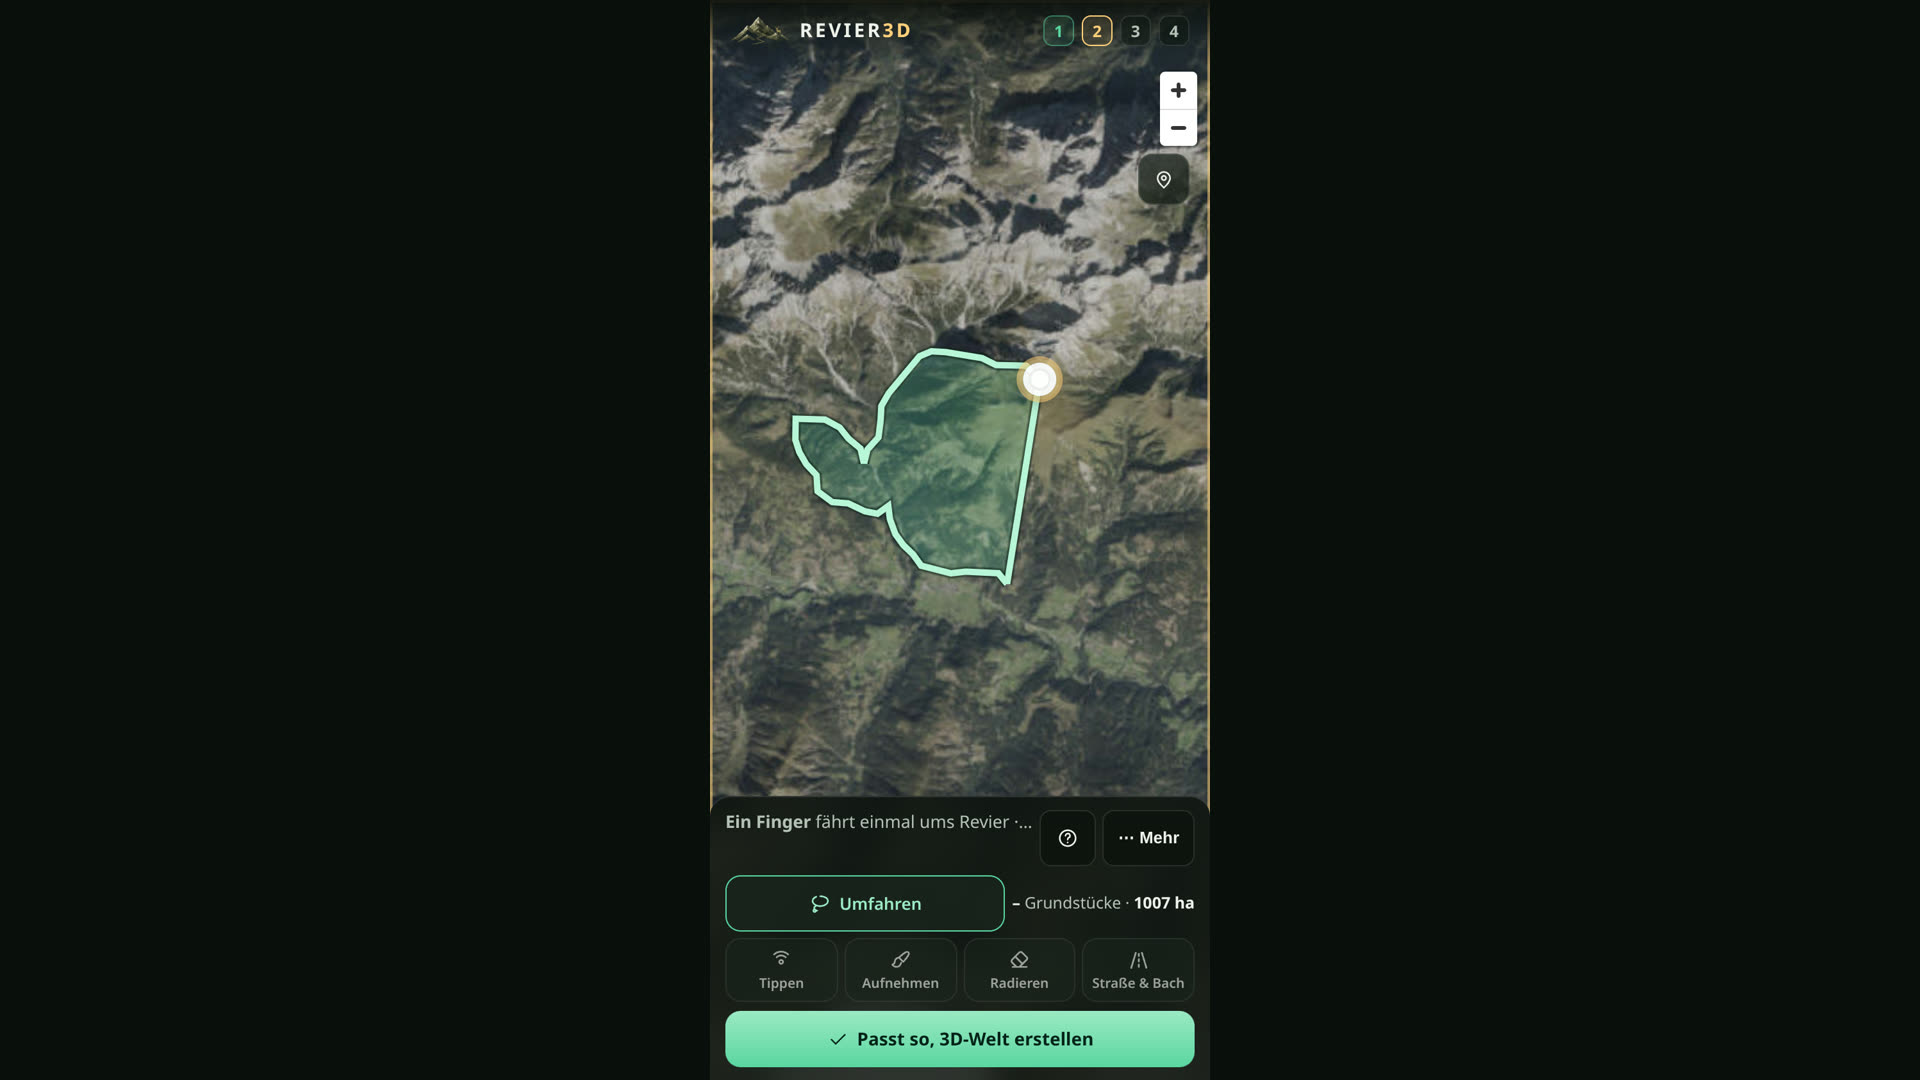 0:22
Creating a ground
0:22
Creating a ground
Name the ground
On the start page tap Create your ground, give the ground a name and choose the province. In the province dropdown, each entry carries its provincial coat of arms as a visual aid. The province later drives the open seasons.
Fix the boundary
Tap the corners of your ground: every tap sets a corner, a tap on the first one closes the area, and the parcels inside come from the official cadastre. If you would rather drive round in one go, use ◯ Umfahren. If you want it exact straight away: tap parcels, use the numbers from your lease contract, or upload a ready-made file. Boundary not to hand right now? Choose only the 3D extent and add the boundary later in the 2D map (⋯ More → 🗺 Edit boundary). Until then the ground area, the baiting area limit and the printable map are missing.
Let it build
One start prepares the 3D map, available surrounding landscape and thematic maps, and all planned aerial-image detail. The build plan first shows the extent, area and data sources. One progress display names the current step and counts completed steps. For aerial tiles it shows the number actually processed; work without a known total remains marked as ongoing. No estimated completion time is shown. Use To the map in the meantime to enter early; the confirmed build continues on the server even if you close the window. It is only complete after final verification and encryption. Errors remain visible, and an interrupted build can be restarted. Your hunting ground and boundary stay saved.


What is the same in all three views
Revier3D has three views onto the same ground: the 2D map, the 3D diorama and the planner. You switch between them with the coloured buttons: at the bottom edge of the screen on a phone, in the tool bar on a computer (in the planner and the account page at the top in the header; in the planner on a phone the header instead carries the compact/standard/full display switch). You land at the same place in the ground where you just were.
- 🦌 Planer (green), 🗺 2D (blue), ⛰ 3D (gold), plus 👤 Konto (account). On a computer all three views sit side by side and the one you are in is highlighted; on a phone the two views you are not currently in are shown.
- 💬 Feedback is in the 2D map under ⋯ More (more) and in the 3D diorama under ⚙ Settings (settings).
- 🔴 Night switches on the red light: the whole interface is tinted red so that your night vision is preserved. This applies in all three views and on the account page and stays on when you switch, even after closing and reopening. Everything really is tinted, including prompts, messages and the tool bar.
- How strong the red is, you set in the 2D map at the top left in the display menu Display: Light (light), Medium (medium) or Dark (dark). The choice appears there as soon as the red light is running. Medium is preset: on a bright topographic map, pure red still dazzles at night.
- The display menu is called the same everywhere: in the 2D map and in the 3D diorama Display sits at the top left. It remembers whether you had it open or folded away, and on a phone it is closed by default. The content differs per view: the map has its layers, the 3D has wind, rings and contour lines. Inside, both maps divide the menu into tabs, each with a short subtitle: ▱ Layers (“Map & appearance”), ⌖ Objects (“Areas & markers”) and, where it exists, ▧ Official maps (“Official information”, its own section below). The third tab exists for Austrian grounds running in the Amtlich mode and for German grounds (with content of its own); otherwise there are two.
- The rows in the menu have followed one pattern since the end of August 2026, the same in both views: each row holds one or two main switches side by side. On the right every row ends at the same point, either with a small ⚙ for the finer settings or with an empty place. Thin lines separate the main groups. On a phone the main switches and the right hand column are 44 pixels high, making them easy to hit with your thumb. The short subtitles under the tabs disappear there to leave more room for the controls.
- Hiding individual marker types works in both views in the tab Objects, in the list under the row 📍 Markers. Listed is only what you have actually placed, in the order of the marker categories and with a symbol, a name and a count per row: a tap on a row hides that type. The nur (only) button next to it does the opposite and hides everything else: only the high seats, only the bait sites, only the game damage. This applies per device and only for you, not for the team, and the map and the 3D remember it separately. Above it stands the same kind of list for the 🟢 Areas; in the 3D diorama a third one follows below for the objects of the surroundings, that is chapels, wayside crosses, mountain huts and so on.
- A marker only opens on a deliberate tap. The map and the diorama tell operating and navigating apart: a short tap on a still picture opens the marker straight away as usual. If instead you pan, zoom, rotate or merely stop the map coasting with your finger, nothing opens any more, not even if a marker happens to lie under your finger. The same goes for areas and paths. In sketch mode nothing opens at all; there you only draw.
- 📴 No signal: if the network drops out, a strip appears at the top. Short on a phone: 📴 No signal · entries are saved, and once something is waiting 📴 No signal · 2 waiting, nothing lost. On a computer the full sentence is there: 📴 No signal. Entries are saved until reception is back. (no signal, entries will be remembered until reception is back). So you can carry on entering things. Nothing is lost, the entries wait. Once the signal is back, the strip turns green (“📡 Netz ist wieder da: 2 Einträge warten.”) and the entries go out by themselves a moment later. That holds even if you pocketed the phone in between and only open the page again the next day. If you would rather not wait, tap Jetzt senden (send now). Nothing is created twice in the process: every waiting entry carries a tag by which the server recognises it again, even if it was only the server's answer that got lost in the dead spot. This runs independently of the offline copy, you need no switch for it (more on that below).
Waiting entries belong to their hunting ground. If you are out in several grounds and switch while something is still waiting, the strip says so: “📴 2 entries are waiting for a different hunting ground. They will go out as soon as you are there.” They are not lost, they are simply at home somewhere else, and they never end up in the wrong ground. If the server turns an entry down outright (because you no longer have the right for it, say), it does not vanish quietly either: the strip says that it has been kept, and next to it there is View. There you see for each entry what it was, when you entered it and why it did not go through, and you send it again or discard it. Discarding is final, so the app asks first. - 🗑 Deleting can be undone: right after deleting, the message at the bottom shows an Undo button. One tap brings the entry back straight away, photos included. Deleted items then stay 30 days in the recycle bin, including the photos, and only then are they removed for good. This applies to markers, cull record entries, high seat sessions, maintenance jobs, follow-up searches, bookings, feeding entries, trail cameras with their images, individual trail camera images, sketches, areas, paths and damage cases.
- You can open the recycle bin later too. The undo button disappears after a few seconds, but nothing is lost with it. In the 3D diorama 🗑 Recycle bin is the last row of the display menu Display; in the 2D map you find it under ⋯ More. The tap takes you into the planner to the “Speicher” (storage) card, where everything deleted is listed with its date and remaining time and each row has an ↩ Zurückholen (restore). What comes back is the same entry, not a copy: name, colour, emoji and everything attached to it are unchanged.
The floating SOS button is switched off at the moment. It existed until 10 August 2026 at the bottom left of every view, but it sat in front of other controls, and an emergency button in the wrong place is worse than none. It will come back as soon as it has a place that gets in nobody's way. The emergency numbers in the meantime: European emergency call 112, police 133, ambulance 144, mountain rescue 140.
Official specialist maps
This tab exists for Austrian grounds running in the Amtlich mode and for German grounds. This whole section describes the Austrian maps; a German ground gets the same tab with content of its own, which is further down under “Hunting grounds in Germany”. If your Austrian ground runs as a Revierkarte, the tab does not appear at all and the display menu has two tabs instead of three; switch it back to Amtlich later and the tab returns, with your earlier selection intact. In a German ground it does not hang on the mode but on the country: the German maps are plain geodata and not a legal basis. The mode sits in the planner under ⚙ Settings. In the other countries the tab does not exist.
In the 2D map and in the 3D diorama the display menu Display then has a third tab: ▧ Official maps. It holds official Austrian maps of your ground: what the forest there is primarily meant to do, where torrent and avalanche control designates hazard zones, where protection forest and banned forest lie, where water and nature conservation applies. Every single layer is off when you first open it. The map stays as clear as you know it, and you fetch what you need at that moment. What you switch on is remembered per ground on your device and applies to both views together: what you turn on in the 3D is on in the 2D map as well. Like every tool, the tab explains itself: the ? repeats the essentials. The German control labels are given below with their meaning in brackets.
- One switch for everything. Right at the top sits All official maps on: one tap switches all fifteen layers on together. When they are all on, the same button reads All official maps off (all off) and takes you back to the clear base map with a single tap.
- 🌲 Forest development plan (Waldentwicklungsplan, WEP), four layers: Waldwirkungen (forest functions), Kreisfunktionsflächen (district function areas), Windschutzanlagen (shelter belts) and Generhaltungsbestände (gene conservation stands). The colour of the WEP areas says in plain words which task of the forest matters most here: protection against natural hazards, the effect on climate, water and air, recreation, or sustainable timber production. When you switch the layer on, the short explanation opens straight away and the button then reads Active · tap an area on the map (active, tap an area in the map).
- The official codes are an optional detail. Below the WEP, Understanding the WEP unfolds: it explains S for protection, W for welfare and E for recreation, together with the ratings 1 low, 2 medium and 3 high. A 0 exists only for recreation; S and W officially start at 1. Next to it you switch the map colouring between Primary function (main function) and Rating (rating), and you can hide individual ratings. All ten ratings are visible by default, and Show all (show all) takes you back there at any time.
- ⚠ WLV, hazards and events (torrent and avalanche control), five layers: Wildbach-Gefahrenzonen (torrent hazard zones), Lawinen-Gefahrenzonen (avalanche hazard zones), Hinweis- und Vorbehaltsbereiche (indicative and reserved areas), Einzugsgebiete (catchments) and bekannte Ereignisse (recorded events).
- Waldschutz, Wasser, Natur- und Europaschutz (forest protection, water, nature and European conservation), the remaining three groups with six layers between them: Schutzwald (protection forest) and Bannwald (banned forest), Wasserschutz- and Wasserschongebiete (water protection and water conservation areas), Natura 2000 (habitats and birds directives) and Naturschutzgebiete (nature reserves). These too stay off on a normal start; only the overall switch at the top brings them along.
- Tap an area. A tap on a coloured area opens the card for it: for the WEP first the primary forest function in plain words, below it the public interest for protection, for climate, water and air and for recreation, and only then the official code. For the other layers you get the designation, the object type, the ordinance, the municipality and whatever else the official source carries. At the bottom of every card it always says where the entry comes from: source, date and licence. If an official WEP report is linked, you open it from there. In the 3D the same areas lie on the terrain, and a tap on the terrain opens the same card.
- The ground manager prepares the specialist maps once. The tab offers ⬇ Prepare official maps for that, and ↻ Update official data later on; the same button sits in the planner on the ⬇ Make available offline card. It appears only when the checked official data set is ready on the server, and only for Austrian grounds: the data is official Austrian data, and there is none here for other countries. As long as nothing is prepared, the tab says openly that there is no map data yet instead of offering switches with nothing behind them.
- They come along offline. Prepared specialist maps are part of the offline copy (see above) and are downloaded in full: in a dead spot everything that was prepared is there. Nothing is fetched on the way. If your ground is encrypted, these files are stored encrypted too and are only opened on your device (more on that under zero knowledge).
A forest development plan can be old. It is revised at long intervals, and a ground may look different since the last revision. That is why every area card carries the date: read it before you rely on a rating. The same goes for the protected areas. What is designated today stands in the ordinance, not on this map.
Where nothing is coloured, that is not “nothing”. It means these maps have nothing recorded here. Whether a parcel lies in protection forest or in a water protection area is answered by the competent authority, not by this layer.
Installing Revier3D and working without reception
Out in the ground there is often no network. The planner therefore has two separate cards under ⚙ Settings → 👤 Personal & device: 📲 Install Revier3D puts the program or an app icon on your device; ⬇ Make available offline additionally downloads the map and ground data for dead spots. One does not switch the other on automatically.
Read more: using the map without reception (German).
- 📲 Install Revier3D. The card is split into Smartphone & tablet and Computer. Every store listing that is live takes you from the card straight to the store; where it still says Coming soon, that particular listing is not released yet. Android devices without Google services deliberately get a secondary route below: Android without Google Play downloads the APK directly, for example for LineageOS. Android may ask for permission to install apps from this source the first time it is opened. The Web app without a store works immediately and uses the same account and hunting ground.
If Chrome or Edge can install it directly, the card shows Install web app now. On iPhone and iPad, Set up web app opens the two Safari steps: the share symbol, Add to Home Screen, then Add. If that entry is missing or the browser refuses, the card shows the working route via Chrome or Safari and offers 🔗 Copy link.
Under Computer, Windows, macOS and Linux start the matching download directly as soon as the package is available. If it is missing, the choice leads to the honest availability display with size, startup and security notes instead. On Linux the DEB package is the main route (Debian, Ubuntu, Linux Mint); the RPM for Fedora, RHEL, Rocky and Alma, the AppImage and the portable builds for a USB stick sit below it under More versions. The AppImage carries a caveat worth reading: on AMD graphics under Wayland it currently does not start reliably, so take the DEB or the RPM there. The page names the version, the size and the requirements for every package, and every desktop build needs the internet once on its first start. If Revier3D is already running as an app on this device, the overview stays available and confirms ✓ Revier3D is installed on this device. The card confirms at the top ✓ Revier3D ist auf diesem Gerät installiert. Below it stands the route to a second device: 🔗 Link kopieren or Link für anderes Gerät kopieren (copy the link). You open that link on the other device in the browser and sign in there once; the account and the hunting ground stay the same. Copying the link is separate from the offline store: whatever you want to read without reception you load onto this device with ⬇ Offline verfügbar machen right below. - ⬇ Make available offline. The card below it, with the switch Available offline on this device. With it on, your device keeps a copy of your ground lists, and you can carry on reading them in a dead spot even when there is no bar left: markers, paths, areas, culls, high seat sessions, maintenance jobs, follow-up searches, feedings, damage, tasks, notes and the ground boundary. Your device also holds on to the map, the terrain and the photos.
The switch applies to this hunting ground on this device. Switching it on for your phone and leaving it off on the computer at home is perfectly fine, the two do not disturb each other. It writes nothing to the server, and it takes nothing away from the others in your ground. You need a running subscription for it, Basic as well as Pro; during the trial the card says so instead of showing a dead switch. In the live demo the card is absent, because nothing there survives a reload anyway. - Include the map, terrain and pictures. When you switch it on, the app asks once per hunting ground: Load the aerial map, terrain and photos as well? Choose Load everything to save the aerial image at full detail, the 3D terrain, photos and camera pictures on your device. Land parcel boundaries and numbers are included in Austria. The app calculates the number of map tiles and megabytes for your ground beforehand and shows them in the question. Best done at home on wi-fi. Use Cancel to stop: downloaded files stay, and missing files follow next time. The topographic map and hill shading are not part of this download. Choose Entries only to start with the lists. You can add the map later in the offline settings.
- Freshen it up before you drive out. Update now fetches the latest state of your lists onto your device. Tap it once at home on wi-fi before you set off and you will have everything with you out there. One tip along with it: on wi-fi, also pan across your ground once with the map. What you have never looked at, your device cannot show you in a dead spot either.
- Clear offline copy clears both halves again: the stored lists of this hunting ground, plus the map pieces, the aerial image and the pictures your device kept for them. This happens on this device only, on the server everything stays untouched, and you can fill the copy again whenever you like. Below the switch it also says how much space is taken up at the moment. If it gets too much for your device, it discards the oldest map pieces by itself, never the terrain and never your ground boundary.
Fixing the hunting ground boundary
The quickest way is tapping the corners: every tap sets a corner of your ground, a tap on the first corner closes the area, and the parcels inside come from the official cadastre into your boundary. If you would rather drive round in one go, use ◯ Umfahren: the same result, just drawn with your finger. Parcels that lie only half inside your area glow golden: one tap decides whether they belong. Alongside that there are the exact routes: tapping parcels, the numbers from your lease contract, or a ready-made file. All routes can be combined and improved later at any time.
Read more: setting a boundary from the cadastre. Map data and availability: Germany and Switzerland (these pages are in German).
In Carinthia, Tyrol, Vorarlberg and Burgenland, and in Switzerland in the cantons of Zurich, Solothurn, Lucerne, Thurgau and Schaffhausen, it is shorter still: they publish their hunting district boundaries. If the centre of your map lies there, the button Use the official boundary appears in the assistant. You get the hunting districts around the map centre as a list with name, type, area and (in Carinthia) the decision number, you tap yours, see it on the map at once and take it over with one button. That makes tracing unnecessary. The button only appears if the source really delivers something for your map centre; Revier3D has not connected a boundary source for the other provinces and cantons. Afterwards you can change the boundary like any other, only the parcel route asks first, because it would replace the official shape.
1. Tap the corners, or trace round
The 📍 Ecken antippen tool: every tap sets a corner, a tap on the first corner closes the area. One finger still moves the map, so you can pan in between and carry on tapping; ↩︎ Letzte Ecke takes one tap back, ✓ Fläche schließen closes the ring without the tap on the first corner.
The second way to the same result: tap the ◯ Umfahren tool and drive round your ground in one go. While drawing, two fingers move the map. The parcels inside your trace are added from the official cadastre, borderline cases glow golden and want to be tapped one by one. Another pass adds more; Start again (under ⋯ More) discards the selection, and the next trace starts fresh.
On a computer the right mouse button moves the map, in every tool. Golden borderline cases do not hold up the 3D build: if no parcel lies clearly inside your trace, the trace itself becomes the boundary and the open parcels are listed in the build plan. You can decide them now or later in the 2D map under 🗺 Edit boundary. Parcels follow the region under your map, not the choice you made when creating the ground: in Switzerland every canton runs its own survey, in Germany every federal state its own cadastre. Where there are none, the assistant names the region, and you draw the boundary or load a file; move the map into a region that has parcels and the tools come back. If your view reaches into a region without parcels, they remain available for the rest. What exists in each state and canton is listed on the country page. In some federal states the parcels exist but no lines are drawn on the map, and in Germany they only appear once you zoom in closer; you see your selection as a green area at any scale.
2. Tap, brush & erase
Tap a parcel: it is added or removed. For large areas you sweep over the parcels with 🖌 Add (they are added) or with 🧽 Erase (they are removed). That is how you get every boundary right parcel by parcel, in the assistant just as later in the 2D map.
3. From the lease contract
Type in the cadastral municipality and the parcel numbers exactly as they stand in the lease contract. The boundary is assembled from the official cadastre in seconds. In the assistant under 📄 Documents. This numbers route only exists in Austria; in Germany and Switzerland, tracing, tapping and file import get you there.
4. Import a file
If you already have the boundary digitally, upload it: GPX from a Garmin, KML or KMZ from Google Earth, GeoJSON or a shapefile ZIP from the authority, in the same place as the lease contract route.
5. Draw freehand
The drawing mode works in every country, even entirely without a cadastre: with ✏️ Nachfahren you trace the boundary with one finger, with 📍 Punkte you set corner points, with ✋ Bearbeiten you drag every point into place (a magnifier shows you what lies under your finger), and the 🧽 Radierer cuts areas out again, enclaves come about by themselves. Several strokes that touch merge into one area automatically; separate strokes stay separate parts. While drawing, two fingers move the map. You find the mode in the assistant (✏️ Zeichnen) and in the 2D map under 🗺 Edit boundary → ✏️ Draw boundary freehand. A boundary from the cadastre can be edited this way too: the app asks once, because after that the boundary is no longer parcel-exact. If something interrupts you in the middle of drawing, a call, a reload of the page or an update from us: the assistant keeps your drawing on this device and offers it again at the top with ▶ Restore unsaved drawing the next time you open it. If saving fails once, the app briefly tries again by itself and otherwise asks you under Saving didn't work whether it should try once more. Your drawing is kept meanwhile; it lives only on your device, never on the server.
What is missing without a boundary: the ground area in hectares, the baiting area limit derived from it, the printable map, the boundary track in the GPX file and the boundary outline in 3D. Every one of those places says exactly that and names the way to add it, instead of quietly calculating with 0 ha.
This is how you add it later: in the 2D map under ⋯ More → 🗺 Edit boundary, with every route above. The mask and the boundary lines come about by themselves afterwards, a second 3D build is not needed for it. Until then the 2D header carries the line 📐 No boundary yet · add it; a tap opens the boundary editor, the ✕ next to it hides the reminder on this device. In the 3D diorama the same reminder sits in the display menu Display right below the boundary switch: no boundary yet · add it in 2D. In the planner under ⚙ Settings → 🗺 Map & 3D the state stands as the line Reviergrenze (boundary), and there you can also rebuild the 3D map with a larger extent if the boundary you added reaches beyond the square.


How much landscape around it?
The slider in the build plan sets the edge length of your 3D world: a square around your ground. The aerial image always has the same number of pixels: a smaller world means a sharper overview, a bigger world means more landscape around you. It gets sharp everywhere as you come closer anyway: the 3D view keeps fetching the sharp aerial image for the whole visible extent, not just for the centre of the picture. You do not have to worry about image sharpness: your ground is always built at the best possible level, on every plan.
Around your ground lies a scenery belt: a further strip of terrain derived from the Austria-wide laser scan, or from a worldwide elevation model, which embeds your ground instead of letting it end hard at the edge of the picture. The scenery is purely visual: it contains no markers, paths or hunting objects. Everything you tap and edit in the diorama stays inside your boundary.
When the takeover does not go through
Normally your parcels are settled before the build: the build plan then stamps Grenz-Quelle: Amtlicher Kataster. If the cadastre query does not work at that moment (a connection error, say), your trace is kept as an area and you can still build; the build plan then shows Grenz-Quelle: Umfahrung, Grundstücke folgen nach dem Bau. After the build the app turns that into a proposal: every parcel your trace touched. This proposal is not yet your boundary: if you drew too wide, neighbouring parcels are in it; too tight, and some of your own are missing. The 2D map therefore writes “(Vorschlag)” next to the area figure and takes you, with a notice, straight into the boundary editor. Look through it once, put it right, ✓ Done: the boundary then counts as checked and the addition disappears.
Changing it later
The boundary is not set in stone. In the 2D map you find the item 🗺 Edit boundary under ⋯ More, with the same tools as in the assistant. ◯ Trace around adds the parcels of a whole area at once (in the 2D map always on top of the existing boundary; borderline cases glow golden again). Tapping a parcel adds it or takes it out; for large areas there is 🖌 Add for quick selecting and 🧽 Erase for taking away. The tool 🛣 Road & stream deals with narrow public parcels: if a road or a stream that is not yours splits your ground into several pieces, one tap on it joins the pieces back into one ground, and another tap separates them again. Only a road that belongs to your own parcels can be excluded: one tap takes it out, another brings it back.
Nothing can be lost: 🛟 backups
Before every change to your boundary the app automatically keeps a copy of the previous state. Under 🛟 Backups in the boundary editor you see these states with their time and area and bring any of them back with one tap. The current state is itself backed up in the process: even restoring can therefore be undone. Only the shoot captain sees this function.
The last 15 states are kept, plus the oldest state of each of the last 14 days. That way the state from before a long editing session survives too.
The editor also watches out by itself: if an action would discard or empty the saved boundary, for example an eraser stroke on an imported boundary, it refuses with an explanation instead of overwriting the boundary.
The finished boundary follows the parcel edges from the cadastre exactly. Areas excluded in the middle of the ground, a farmstead belonging to someone else for instance, remain as a hole in the boundary. They do not count towards the ground area and are outlined separately in the diorama.

Operating the 3D diorama
Your hunting ground as a terrain model you can walk through. It comes about fully automatically from the official BEV laser scan (1 m source data), with the real aerial image laid over it. Everything runs in the browser, you need no extra program. If you like, you can still put Revier3D on your home screen like an app (here is how).
The 🔴 night mode applies here too: if you switch it on in the 2D map, it is still on when you change to the 3D, see “What is the same in all three views”.
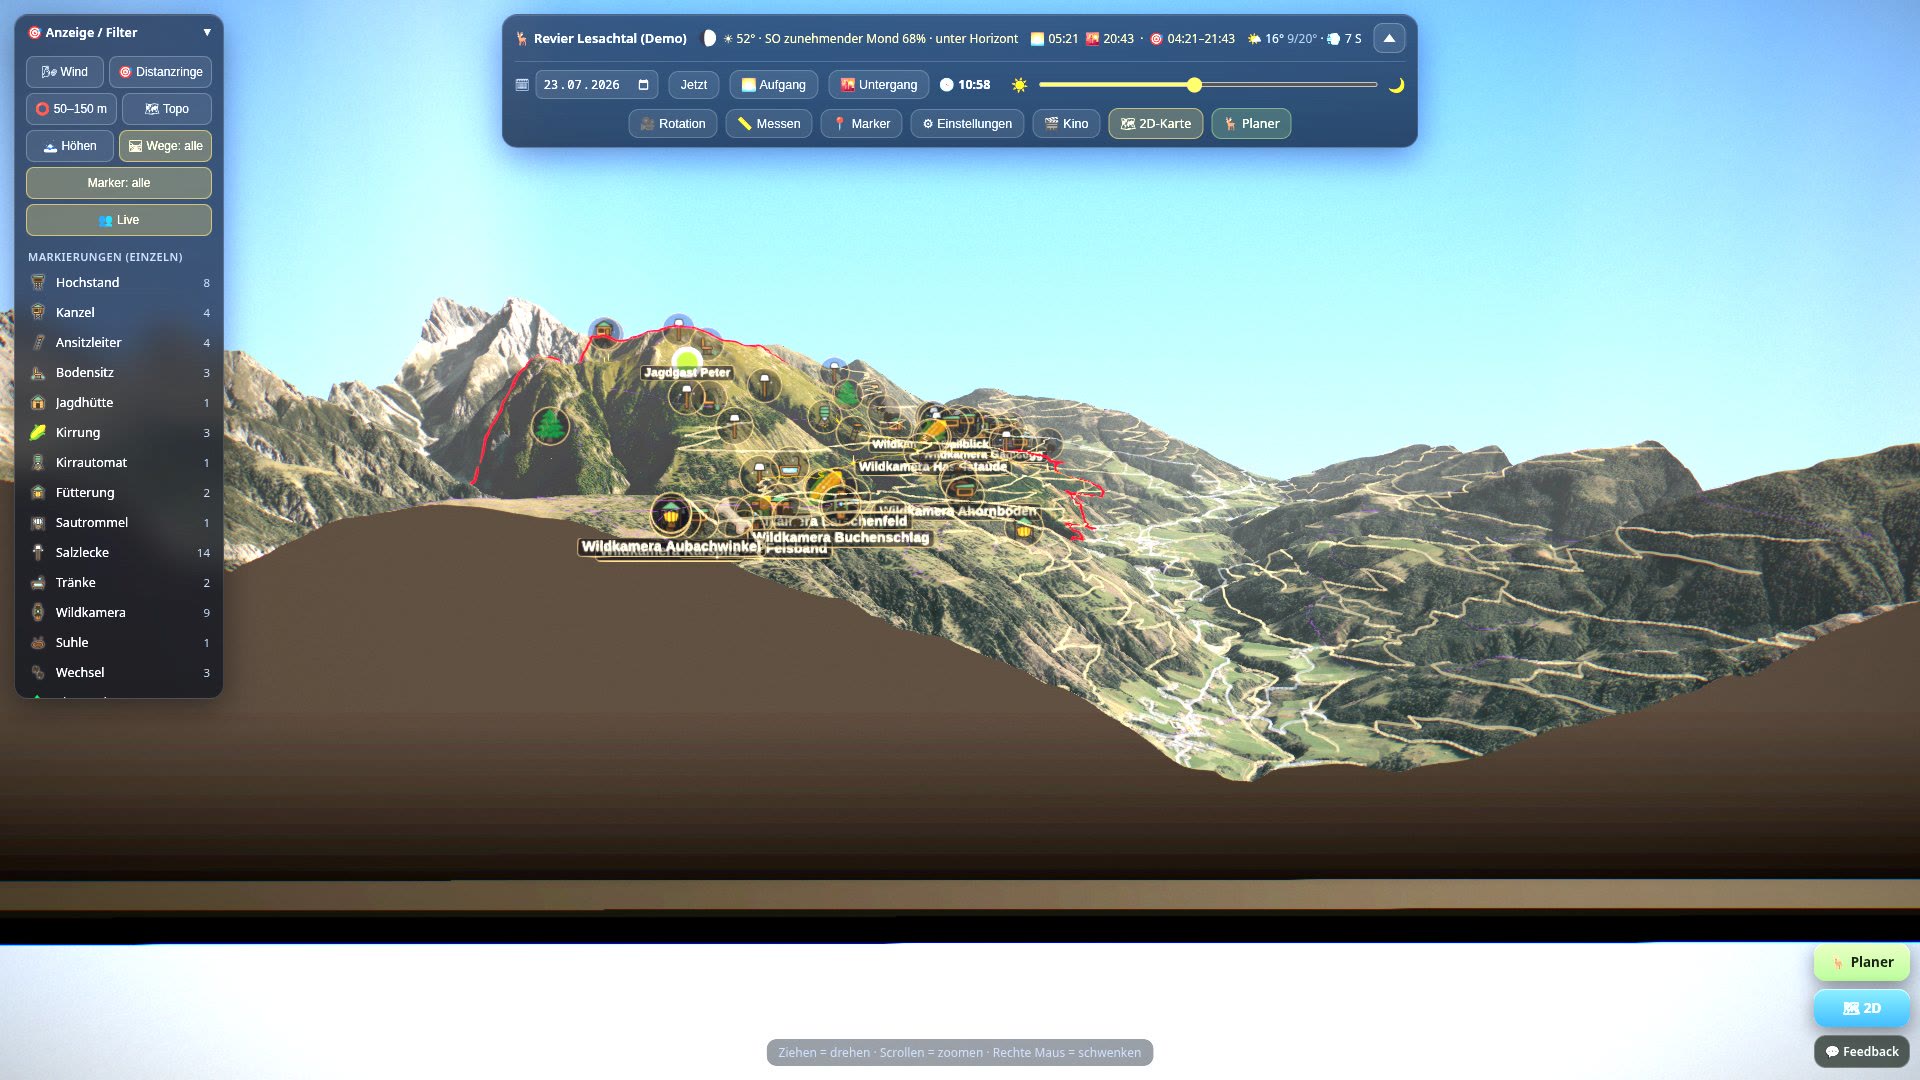 0:22
Operating the 3D
0:22
Operating the 3D

Moving about
- Rotate and look around: drag with the left mouse button, on a phone swipe with one finger. In the overview this rotates the terrain. Once you are standing down on the terrain, your position stays fixed: the same gesture only moves your view, freely all around and upwards into the sky.
- Zoom: the mouse wheel, on a phone pinch with two fingers. Without switching modes you can travel to any terrain point at an eye height of about 2 m; as you come closer the view keeps fetching the sharpest aerial image available. Very close up the picture still goes soft: the aerial image was taken at about 30 cm per pixel, and more closeness only magnifies it, it cannot make it sharper.
- Pan: drag with the right mouse button, on a phone push with two fingers.
- Tap a marker: this opens the info card with the name and the details. It closes with the ✕ at the top right, with Esc or with a tap beside it. The deliberate tap is what counts, see What is the same in all three views.
- Getting lost is impossible: The camera can no longer leave the diorama. You can look at the ground from outside, but not fly off into nothing.
The bar at the top: time, weather and tools
The top bar is clickable throughout, no longer a plain text display. Each block is its own button with a visible frame:
- 🌙 Moon on the far left shows the lunar disc, how much of it is lit and whether it is currently in the sky (🌔 63% ↑; an arrow pointing down means it has set). A tap opens Mond & Himmel (moon & sky): at the top the exact state (phase, altitude, compass direction, rise and set of the moon and the sun), below that a moon calendar over 14 days with phase, illumination, rise and set, and how many hours the moon stands above the horizon: the figure that matters for the high seat. A tap on a calendar row sets the date and time to the moonrise of that day. Right at the bottom sit the display sliders (brightness, size, distance of the visible disc).
If a day shows no time, that is not an error: the moon rises about 50 minutes later each day, so not every calendar day has both a rise and a set. - ☀ Simulate the sun is the small sun button between the moon and the open season. A tap sets the time to 12:00 today and switches from real time to a time of your choosing: from then on the clock in the picture stays where you put it. The button glows while that is running; another tap brings you back to the live time, exactly like ↺ Today in the light band. Because a chosen time of day does not go with the weather of this minute, the live weather switches off along with it.
- 🌅 Sunrise and 🌇 sunset stand as small time buttons at their real place in the light band, and they do so for every day the band is currently showing: a tap jumps the clock to the morning or the evening session, without pulling the band away from under your finger.
- 🎯 Open season (for example § 🎯 04:44 to 21:45) is itself the button: a tap opens the legal basis popup with the paragraph, the LGBl number, a link to the text of the law and the list of animals that may be hunted at night (wild boar, for example), including whether they are currently in the open season or the close season. What prevails is the hunting regulation of your province; the class-exact times are in the planner. If your ground is set to the operating mode “ground map” (instead of “official”), the button is absent altogether. The app then provides no legal statements.
- 🌤 Weather shows the current weather with an emoji, the temperature and the wind (on a computer ☀️ 14° 12/23° · 💨 7 N, on a phone shortened to ☀️ 14° · 💨 7; the day's range and the wind direction are in the popup). A tap opens the weather popup, see “Weather” just below.
- On a phone the moon, the sun, the open season and the weather stand together in one line. The clock is not in that line but sits as a bubble in the light band below it (explained in a moment). Fold the bar away and the light band goes with it; the ▾ button brings it back. A tap on the moon, the open season or the weather opens only that window; the bar does not unfold in the process. You unfold it with the ▾ button or with a tap on the free part of the bar.
The light band is a window onto an endless time axis, no longer a slider that stops at midnight. One whole day is visible at a time. When you drag the pointer, it travels with you at first; once it reaches the edge it stays put and the band travels on. That is how you drive through the night into the next sunrise, with its real times and its open season limits. Hold your finger right at the edge and the axis keeps running by itself, easing in gently; let go in mid travel and it runs on a little further. A tap in the middle of the band sets the time straight to the spot under your finger.
The band carries everything you need about time: the colour run from night through twilight into day, the red marks of the open season, the times of sunrise and sunset as buttons you can tap, and at every midnight the date mark (Fr 31. Jul). So as you travel on you can see which day you have landed in. The bubble on the pointer is the clock: when you are on today it shows only the time, on any other day the date as well (Fr 31.7. · 06:12). The sun, the moon and the shadows stand astronomically correct while you do.
Two buttons sit in the band itself. 🗓 opens the calendar when you want to jump a long way, and ↺ Today brings you back to today and the live time. The ↺ button only exists while you are not on today: a button with no job is not shown. A time you have chosen yourself survives a reload of the page, so you come back out where you left off, until you tap ↺ Today. As long as you have chosen nothing, the clock follows the real time and moves along by itself.
The tools next to it:
- 📷 Photo is the first button in the bar and the quickest grab out in the field: tap it, the phone camera opens, take the picture, tap the type, done. The marker lands at your GPS position, the photo hangs on it, and its card opens straight away. If a suitable marker already stands nearby, the app asks first whether the picture should go on that one instead. The tool ends after this one marker; to set several in a row, take 📍 Marker. If GPS is not there yet or refuses, simply tap the spot in the terrain.
- 🙋 Where am I? switches on navigation: the view flies to you and from then on follows you as you walk, at a slant from above and behind, facing your direction of travel, with a view of the ground ahead of you, like a car navigation. The button glows while this runs, and a further tap brings the view back to you. At the top of the bar sits the navigation line: the GPS accuracy (GPS 8 m, yellow when the signal is poor), your height above sea level from the terrain model and your nearest own marker with its distance (🪜 Kieneck 240 m). Swipe the map and the view lets go of you; the ⊕ Centre button below the compass appears only then and brings it back. Zooming with two fingers does not interrupt the following. If GPS is missing or you are outside the 3D area, the line says so and navigation stays on. ✕ in the line ends it: the view stays where it is and your own dot disappears again. The ? next to it explains everything once more. Your position is visible only to you. 📡 Send live position is independent of this and transmits it continuously to your fellow hunters in the ground; while that is running the button is called 🛑 Stop sending (short word Stop), the navigation line shows a 📡, and your dot stays on the map even after the ✕. When you stop sending, your dot goes as well, as soon as nothing else still needs it. On a phone the short words Position and Live stand under the symbols.
- 📍 Marker puts a point into the terrain. The 3D view uses the same tool bar as the 2D map: the type as symbol tiles, a name field, plus 📷 for photos and 📍 My location as a labelled button for your own GPS position (your position runs along as a blue dot while the tool is open), all of it before you tap and with no form afterwards. You move existing markers by pressing and dragging them: on the first tap a preview sphere appears, with a further tap you adjust the position, and ✓ Hierher moves the marker for good.
- 🟢 Mark area draws freehand areas: you set the category, the emoji and the name in the bar beforehand, several strokes per area are possible, with ↩ you take the last one back and ✓ Done saves immediately. With 2 fingers you move the picture meanwhile. You can change the type while drawing too, using the type chip in the header of the bar, and afterwards just the same: tap a saved area, change type, name, emoji and colour in the card, save. A mistyped entry no longer means drawing again.
- 🖌 Sketches draws into the terrain, with the same tools, colours and widths as in the 2D map and onto the same sketch (explained in full there). What you draw in the diorama afterwards lies on the 2D map too, and the other way round.
- 📏 Measure (measure): tap two points into the terrain. The result stands right in the tool bar, in four lines: straight line, horizontal, height and the line of sight. That tells you whether terrain stands between the two points: ✓ clear (clear) or ⛔ verdeckt ab 180 m (obscured from 180 m). It is calculated from 1.6 m above the first point (eye level standing) to 0.5 m above the second (the body of the animal), against the elevation model of your ground. The vegetation is not in it: a line through dense spruce is geometrically clear and still no field of fire. That is exactly why the first line is plainly called Luftlinie (straight line) again and no longer “shooting distance”: that word only belongs there once the sight line has really been checked. The tool stays on: the next tap into the terrain begins a new measurement, and only ✕ ends measuring.
- 🥾 Stalking path (stalking path) draws a freehand path into the terrain, with the metres of climb running along. Left button or one finger draws, right button or 2 fingers move the picture, the mouse wheel zooms. The tool bar at the bottom: live statistics (distance, climb ↑/↓), ↩ Undo deletes the last stroke, 💾 Save stores the path as a stalking path line (it appears automatically in 2D and 3D), ✕ cancels. You give it a name right there in the bar. Lifting off only pauses; drawing on continues the line. Alternatively the path records by GPS: start 📡 in the bar, pocket the phone and set off. Waypoints appear as you walk (minimum spacing 3 m, inaccurate signals are discarded), ⏹ ends the recording. After that you can keep drawing freehand or save straight away; ↩ undoes the whole GPS stretch in one go. While the recording runs, freehand drawing is locked.
- 🔭 Visibility answers the question you go to the high seat for in the first place: what can I see from here? The tool starts in the “all” view: it shows all your stands combined straight away. Green is what is visible from at least one of them, grey what none of them can see. Tap an individual high seat or a point in the terrain to switch to its single view; the Alle Stände (all stands) button brings you back. Set the radius on the slider in the bar (200 to 750 m, freely selectable). A small golden column marks each standpoint, so that at a 750 m radius you can still see where the calculation started. The visible share as a percentage stands large in the title line; the line below names the tapped standpoint and the colour legend. If you tap a high seat, its eye height applies (see distance rings further below); at a free point in the terrain it is 1.6 m. The bar also holds the slider “Augenhöhe” (eye height): if you drag it, the sight check is calculated with exactly that height, independently of the high seat. 0.5 m is sitting or lying, 1.6 m standing on the ground, 4 m a high seat. The slider stays where you set it until you press ✕ on the slider or leave the tool; the next tap then calculates with the new height. New since 5 September 2026 is the 🌲 button in the same bar: it adds the measured tree heights, so woodland really does block the view; you and the game stand on the ground, rides along forest roads and streams stay clear, and so do the first ten metres around you, because otherwise every high seat inside a stand would be blind. The title line then shows both shares side by side, with woodland and without. If your ground has no tree heights yet, the button says so and the calculation keeps to the terrain alone. 📏 Measure carries the same button, where the Sichtlinie (line of sight) row then also names whether woodland or terrain is in the way. The next tap recalculates, ✕ ends it.
The settings are reached at the ⚙ cog at the top right in the display menu Display, even when the box is folded away. It opens a shared settings centre with a search and seven clear compartments. The small cogs beside wind, distance rings, safety, paths, areas and markers lead straight to the matching control in that centre.
On a phone the bar shows the same tools space-savingly as a symbol grid with a short word underneath: 🔭 Visibility is called View there for short; the clock sits as a golden chip at the top of the title line.
Watching aircraft & helicopters
The ✈ symbol beside the chat appears when suitable flight data is received over your diorama or its matching nearby terrain. Tap it to view the flight nearest the centre of the diorama and follow its movement. Another flight switches flights; Back to the ground restores your previous view. Sun position and time controls change the light, not the time of the flight data. If the flight leaves your diorama it keeps going over the surroundings, for as far as the drawn landscape reaches. To make that possible the surroundings switch on for this view when you tap; your saved setting stays as it is and applies again next time you load the page.
No symbol does not mean there are no aircraft nearby. Coverage is incomplete, especially for low-flying helicopters; data can be delayed or missing. Flight viewing is not yet available for some older terrain versions. Models are simplified and heights approximate. When no new positions arrive for the flight on screen, the view ends with a short note instead of leaving a still image. This display is not for air navigation.
Under ⚙ Settings → Weather & sky → Aircraft & helicopters you can turn off the symbol and data requests on this device. An internet connection is required. Flight data: ADSB.lol, ODbL 1.0. Our server requests fixed areas for Austria, Germany and Switzerland; your hunting ground coordinates are not sent to the flight data provider.
Weather and forecast
A tap on the weather field at the top opens the forecast: the weather now, the next 48 hours and the coming 7 days. For Austrian grounds the data comes from GeoSphere Austria (CC BY 4.0), and from the third day onwards from Open-Meteo; for German grounds from the Deutscher Wetterdienst (CC BY 4.0) via Bright Sky; otherwise and as a fallback from Open-Meteo, in each case for the area of your ground. The wind field of the flow display comes from Open-Meteo everywhere. Open-Meteo runs on our own infrastructure; our server temporarily processes the weather location rounded to 0.01 degrees, without permanent weather-location logs. The live weather switch and the appearance in the diorama sit together under ⚙ Einstellungen → Wetter & Himmel (settings, weather & sky); a button there leads straight back to the forecast.
The live weather switch is on from the factory: the display in the diorama then follows the real weather at the ground automatically, and rain, fog and light adapt to it. If you switch it off, the picture jumps back to “clear”, so you do not have to tap “Klar” by hand first. Choosing a weather situation by hand switches live off as well, and your explicit choice is remembered on this device. A time of day you choose yourself also switches live off: the weather of this minute does not belong to another day.
In the same settings compartment, deliberately set apart, sits 🔒 Kein Wetter abrufen (do not fetch weather). It means something different from the live switch: from then on this device asks no weather service at all any more, not even for the forecast in the planner, and the automatic wind is gone. The switch applies per device; switching it back on happens in the same place. What this means for privacy is explained on the security page.
- Now: symbol, temperature, wind with direction and precipitation, updated every 15 minutes.
- The next 48 hours as a strip to drag sideways: per hour the time, symbol, temperature and chance of rain. The current hour is highlighted. In between stand golden marks for sunrise and sunset with the time: for the high seat, twilight is usually the real information, not the temperature.
- 7 days: per day the symbol, the lowest and highest temperature, wind with direction, rainfall, the moon phase with illumination and, on the right, the high seat rating from one to three dots. It is the same as in the planner and adds up wind, rain and moon; how much the moon counts you set in the planner under “Übersicht”. The reason for the rating appears as a tooltip at the mouse pointer.
Under ⚙ Einstellungen → Wetter & Himmel (settings, weather & sky) you also control how the weather looks in the diorama. The live switch only governs whether the weather service drives the display; the fine tuning stays here:
- 6 weather situations as a preview: clear, showers, steady rain, storm, thunderstorm, morning fog. With a thunderstorm comes heavy rain in a gloomy mood. The lightning effect is still to come.
- Fine control: “Wolken im Himmel” (clouds in the sky) is off by default and can bring the layer of clouds in the sky, along with the drifting cloud shadows on the ground, back into the picture when you want it. Plus rain particles on or off with rain density, and “Atmosphäre (Fog + Sonne)” with the sliders for fog boost and dimming the sun. There is nothing more there: the panel no longer holds any slider without an effect.
Camera studio (formerly “cinema”)
Where it lives: since August 2026 the camera studio is no longer in the tool bar, but under ⚙ Einstellungen → Kamera & Hilfe (settings, camera & help), button 🎥 Kamera-Studio öffnen (open the camera studio). Nothing has been dropped, it has only moved: flight paths, angles of view and choreography govern the picture and not the hunting ground, and in the row of hunting tools they were mostly in the way. That is also why it no longer has its own short word on a phone.
The camera studio replaces the former two buttons 🎬 Kino and 🎥 Rotation. It is a single panel with eight sections that you set up once and then start. The camera takes your ground on autopilot. The most important controls at a glance:
- Mode: a single flight, an endless loop or a gentle rotation (the old auto-rotate button).
- HUD behaviour: whether the control bars are hidden during the flight.
- Flight path with 5 profiles (standard, close & low, high orbit, spiral, panorama pull-up) plus 🎯 waypoint: tap two points in the terrain (start and stop), choose the path (straight, gentle curve or arc), with the flight height above ground and the viewing direction freely adjustable.
- Camera optics: angle of view (FOV 35 to 90°), tilt, roll, look-at smoothing.
- Time of day: preset (day, morning, golden hour, night), a day and night cycle during the flight, or a manual time.
- Motion: easing function and the feel of a forward crane.
- Dev diagnostics (optional): a small overlay at the bottom right with live camera values (position, distance, azimuth, FOV and more). It can also be switched on without the panel via ?dev in the URL; it stays visible in cinema mode and helps with fine tuning.
- Actions: ▶ Start, ⏹ Stop, 💾 Sichern (remember the settings in the browser) and 📋 JSON kopieren (the configuration as text, to share).

Keyboard shortcuts (for quick shots)
Only in the 3D view, on a computer. The hotkeys are meant for racing through the lighting moods and camera positions without a mouse: for screenshots and demonstration videos. They only take effect when no text field is focused (a marker name, the search) and no dialogue is open; Escape still does what it always did (cancel a mode, close a form).
Open the print-ready A4 cheat sheet. Ideal for your desk or as a PDF beside the editing suite.
| Key | Effect |
|---|---|
| Time of day & date | |
| → / ← | Time ±15 minutes (the sun and the moon move with it at once) |
| Shift+→ / ← | Time ±1 hour (for hunting the golden hour) |
| Shift+↑ / ↓ | Date ±1 day (season and sun position, without changing the time) |
| J | To the sunrise of the day currently set |
| K | To the sunset of the day currently set |
| N | Back to today: date and time jump to live |
| Camera | |
| Space | Auto rotation on or off (a gentle turn around the ground) |
| , / . | Rotation slower or faster (only useful while the rotation is running) |
| + / − | One zoom step in or out |
| Alt+1 to 4 | Four camera presets: overview, height, oblique, close |
| Shift+K | Open or close the camera studio |
| Display | |
| F | Photo mode: hides all the control bars (a clean view for screenshots). F again puts everything back. Ctrl+Shift+S (your operating system's screenshot) then takes the picture. |
| H | Fold only the HUD (the bar at the top) in or out |
| E | Observer eye height: lowers the camera to 1.7 m above ground at the current position (orbit limited to 30 m). E again restores the previous camera pose. It is no good for walking through the terrain (there is no WASD control for that), but it gives an impression of how big a high seat or a box seat looks from the hunter's point of view. |
| Layers on and off | |
| M | Markers |
| G | Areas |
| R | Distance rings |
| B | Ridge shadow (the projected shadow of the crest, on or off) |
| Shift+S | Stars (visible only at night) |
| Shift+T | Topographic map instead of the aerial image |
| Weather | |
| L | Live weather on or off. If you switch it off, the picture jumps back to “clear” (the same as the switch at the top of the weather popup). |
| 1 to 6 | Weather situation by hand: clear, showers, steady rain, storm, thunderstorm, morning fog |
The display menu Display
At the top left, as in the 2D map, sits the display menu Display. It remembers whether you had it open, and on a phone it is folded away by default. Inside, the tabs lead through the content: Layers for the terrain and the display, Objects for live locations, areas, markers and local objects and, where it exists, Official maps (explained above). In Layers, the controls are grouped by purpose and separated by thin lines. Map and terrain controls cover elevation, Topo, the boundary, paths, the surroundings, the local area and buildings. Another group controls the content of the ground: areas, markers, sketches, culls and name labels. Planning and display controls cover wind, thermals, distance rings, safety and night mode; 🗑 Recycle bin is a text link rather than a switch. Which controls are shown or enabled depends on the available data and the state of the ground. Sketches appear only when there are sketches, and culls only when there are located cull record entries. Preparing or refreshing the surroundings is offered only when a build is possible or needed.
- The compass has not been in this menu since August 2026, but sits freely visible in the corner (bottom right on a computer, top right on a phone): a round disc on which N, O, S and W move along. At the top there is a fixed mark showing where you are currently looking; below it you read the direction in degrees. Two fine arcs run along the ring: the golden one is the path of the sun on that day from rise to set, the pale one that of the moon. The sun and the crescent sit on their respective arc as long as they are above the horizon. A tap on the disc turns the view to the north, gently and without changing your height.
- 🌬 Wind: an arrow with direction and speed, plus a traffic light per high seat (green = favourable, amber = crosswind, red = unfavourable). All attraction points within the set radius are assessed (bait site, feeding site, wallow, salt lick, carrion bait site, water trough), and the worst rating wins: whoever relies on the traffic light should be able to rely on the worst case. The legend at the bottom left names the point that causes the colour, with the reason (“Kanzel Ostgraben zur Kirrung Bach: Wind trägt hin”, the wind carries towards it). On top of that comes a simple thermal rule from the sun's position: if the sun stands above 6°, the air rises along the slope; below that, cold air flows down the valley. Above 12 km/h of wind the app says nothing at all about thermals, because the valley wind then covers them.
The ⚙ next to it opens the wind settings: the source automatically (the weather service) or entered by yourself, the range at which a high seat “counts as affected” from 200 to 1000 m, and below that it is written out what the colour rests on and what is not in it: flow around knolls and ridges, eddies behind the woodland edge and standing cold air in a basin are calculated by nobody. If you know the thermals on the spot better than the rule does, set the source to ✏️ Manuell.
Wind and thermals start off. On a device that has not stored a choice of its own yet, the flow and thermal layers are switched off, and Zurücksetzen (reset) in the wind settings leads back to exactly that quiet state. A map should start calm; you fetch the arrows when you need them. Your own choice is untouched by this: once you have switched the wind on, it stays on. - 🎯 Distance rings around every high seat, following the terrain. They no longer show only the distance but also the line of sight: ring segments that lie behind a knoll or an edge as seen from the seat are drawn dark. The legend adds how many per cent are freely visible and how many high seats were included. In the ⚙ popup next to it you choose the range (50 to 150 m, 150 to 250 m, 200 to 300 m, 300 to 500 m or 450 to 750 m), enter your own values and deselect which high seats show rings. There you also set the eye height per seat type that is calculated from: preset are 4 m for a high seat and a box seat, 3 m for a ladder high seat, 1.2 m for a ground hide; the target lies at 0.5 m above ground. The sight check can be switched off, and then you get plain distance rings again. The vegetation is not in this either.
- ⚠️ Safety colours the areas that lie within the set distance of a protected feature. Five categories can be switched on and off individually, each with its own distance: 🏠 buildings from OpenStreetMap, 🏡 structures from your own markers (a hunting lodge, a car park and a chiller are counted), 🛤 roads, 🥾 tracks and footpaths and 🛣 forest roads. Preset are 150 m for buildings and structures and 300 m for paths; roads, tracks and forest roads start switched off, because at 300 m a whole ground would otherwise be coloured over and the layer would be worthless. The legend in the menu lists every switched-on category with its distance, marks those for which there is no data at all, and states below how many per cent of the map window lie within the set distance. If nothing is coloured, it says explicitly that this does not mean “safe”, but that nothing is on record here for those categories. The number of paths and structures found, all the settings, the small print and ↺ Zurücksetzen sit in the ⚙ next to it.
Danger sectors at the high seat can be switched on there as well. At the seat, the wedge in whose direction a protected feature lies is then coloured, and it is coloured from the place where the feature begins, outwards: the bullet carries on. The calculation runs out to your largest distance ring. That is deliberately not a figure of its own: how far a bullet carries depends on the calibre and the projectile and stands in no map. If you want to calculate further, set the distance rings further. The same high seats apply as there, and so does the same deselection. If the seat itself already lies within the distance, the whole rose is coloured, and the legend says so separately. - 🦌 Culls: the bag of a hunting year as points in the terrain, coloured by species. The row only stands when there are located culls at all. In a ground without culls the button would otherwise stand for an empty promise. The button is a cycle: tapping on switches through the most recent hunting years and then switches off again. Below it stands the species legend with the numbers. Entries without coordinates are not drawn, and the menu tells you how many those are: someone with twelve rows in the planner and nine points in the terrain should not take the map for broken. A cull gets a place by itself if you enter it via the green button at the high seat (see the planner).
- 🟢 Areas: species zones and areas you have drawn yourself, following the terrain. You create your own categories with a colour and an emoji through the areas ⚙ in the Objects tab.
- 🗺 Topo + 🗻 heights: the topographic map instead of the aerial image, plus contour lines at 20 m intervals and slope shading.
- 🏔️ Surroundings: the surroundings lay a high resolution landscape around your ground and a light distant backdrop behind it, so that the diorama does not stop at the boundary. On a computer it starts off, on a phone on: on a strong Android device and on iPhone and iPad it is switched on out of the box, on a computer you fetch it with one tap. On strong devices it starts on: if your device is powerful enough it is switched on out of the box, otherwise you fetch it with one tap. Once you have switched it yourself, your choice applies from then on. The ground management prepares it once via 🏔️ Prepare surroundings in the same tab; while it is being built the button reads Surroundings loading …. The mountain huts of the area no longer hang on this switch but on 🧭 Local names just below it. Outside your own ground they do need the landscape of the surroundings as ground under them, otherwise they would stand in nothing. On weak graphics the belt stays away so that the view runs smoothly.
- 🧭 Local names: the switch beside 🏔️ Surroundings brings the public place names and objects of the area into the picture: summits and saddles with their official elevation, field and water names, and chapels, wayside shrines, wayside crosses, summit crosses, monuments, ruins, castles, other people’s hunting cabins and mountain huts. Do not mix it up with 🏔️ Surroundings right beside it: that one switches the landscape around your hunting ground, 🧭 Local names its lettering and its objects. Local names start off everywhere. The switch only exists at all once the surroundings of the ground have been prepared and names or objects came with them.
The ⚙ beside it opens Set up local names. At the top sit five switches for the big groups, all on from the factory: ⛰ Mountain names, 🌿 Field names, ⛪ Chapels & wayside shrines, Other parties’ hunting cabins and Mountain huts; the two hut rows show the real map symbol rather than an emoji. Below them, under What of it stands in the terrain, comes one row per kind of object, each with its map symbol and the count in your ground: 💧 Springs, Chapels, Wayside shrines, Wayside crosses, Monuments, Ruins, Caves and whatever else your ground holds. A tap hides exactly that kind and leaves the others alone; All objects at the top of the group clears the terrain with one tap and fills it again with the next. Everything is on out of the box. It is the same selection as in the Objects tab and not a second set of switches: what you change here changes there too. Right at the bottom the slider Text size of the names runs from 15 to 90 per cent, preset to 50: if the signs in the terrain are too small or too loud for you, set them to your own measure here. The slider applies to your device and only to the name signs, not to the objects. Below it ? Explain place names leads into the full explanation.
Names stand as lettering in the terrain, and where several sit close together the signs are stacked at different heights rather than laid over one another. Objects are markers: chapels, shrines, wayside crosses and huts appear as a symbol in your marker style, by now exactly as large as your own markers and following your personal size slider. You can switch off each kind of object on its own, either in the Objects tab or in the ⚙ under “Set up local names”. Springs hang on 🧭 Local names as well: turn the local names off and they go with them, and their row in the Objects tab shows that too.
A tap opens the card for it: the type, the elevation, the position and, where available, a short Wikipedia extract. For small monuments it may also show the inscription, year built or date, material, denomination, elevation and links to Wikipedia and Wikidata. These details come from the source and are often patchy: only about one in eight wayside shrines has any of these extra details at all. Monuments and castles have a noticeably better yield, but their records are not complete either. The first Wikipedia paragraph stands open, the rest unfolds under More from Wikipedia. Where several spellings of a name are known, they stand below it as also: …. The source, the data date and the licence sit behind the ! button at the top of the card, so that the card itself stays short.
Name data: Bundesamt für Eich- und Vermessungswesen (BEV), CC BY 4.0. Chapels, wayside shrines and wayside crosses come from OpenStreetMap: © OpenStreetMap contributors, ODbL 1.0 (openstreetmap.org/copyright); the derived data set is available free of charge at revier3d.at/odbl/. Wikipedia extracts CC BY-SA 4.0. The inventory is neither complete nor legally authoritative; names handed down only by word of mouth are not in any data source, so add your own marker for those. The names come along offline and are stored encrypted in an encrypted ground. They appear once the surroundings of the ground have been rebuilt. - 🏠 Gebäude (buildings): houses, barns, cabins and sheds stand as solids in the terrain, right below the row with the surroundings and the local names. The layer is on out of the box. The ! button to the right of the row opens the note about it: how many buildings there are and where each height comes from, namely measured from the laser scan, taken from OpenStreetMap or estimated from the footprint. What gets built is what lies within roughly 2.4 km of the point you are looking at, so that a large ground does not slow the view down; while something is still outstanding the note names both figures (“120 Gebäude im Revier, 74 im Umkreis gebaut”), rather than claiming that everything is already in the picture. If the heights are still missing, if no buildings have been fetched for your ground yet or if your device cannot carry the layer, that is exactly what it says instead of writing a 0. The ! stays tappable even when the switch itself is locked: that is precisely when the note carries the reason. The buildings come from OpenStreetMap, so they are maintained voluntarily and are not complete: what nobody has drawn there is not here either, and a house demolished long ago may still stand.
- 🏷 Name labels: the signs carrying the marker names above the symbols. The button sits in the same group as 🦌 Culls and cycles through four steps: off, cameras only, all, stands only. It is preset to off, so that a ground with many markers does not open as a carpet of lettering; your device remembers your choice. The same switch also sits in the ⚙ of the marker row, and both always show the same state. The row is always there, even in a ground with no culls at all.
- 🛤 Paths: one switch, on or off. On shows everything that is a path: forest roads, roads and tracks from the map plus your own lines, that is stalking paths, forest roads you drew yourself and recorded tracks. Off takes all of it out of the picture. The ⚙ next to it holds the fine setting Nur Wege im Revier: it limits the display to your ground boundary as soon as one is ready, and it cannot override the switch. If no boundary is on record, the settings say so and the box stays disabled.
- 🌊 Rivers and streams have no separate switch in 3D, they are a fixed part of the terrain. Since September 2026 they are drawn as wide as they really are: a river about 7 m, a stream 2 m, a ditch a good metre, with a light current in the water. From the overview they stay visible as a fine line so that a stream does not vanish altogether. Standing water is still missing: so far the data source only delivers flowing water, so a lake or a pond is not drawn in the diorama.
- 📍 Markers and 👥 Live: the marker button in Layers switches in two lines, with a position indicator, through the steps that can show something in this ground: all, only high seats, only trail cameras, none. Empty intermediate steps are skipped. The finer settings sit in the ⚙ next to it: tappable, map locked, name plates, “names only when selected” and size. In Objects, 👥 Live comes first; below it you show and hide areas, markers and local objects by type.
- ▧ Fachkarten: the third tab with the official maps, that is the forest development plan, the hazard zones, protection and banned forest, water and nature conservation. In the 3D the areas lie on the terrain, and a tap on them opens the explanation. Its own section above.
Buildings come from OpenStreetMap and can be missing. That map is maintained voluntarily: a house, a stable or a playground that nobody has drawn there does not appear here either, and a building demolished long ago may still be in it. So do not rely on everything being there that stands in the countryside. What is missing you can add: place the building as a Jagdhütte (hunting lodge) marker, and the layer buffers it too.
For older grounds the buildings are fetched once, after the fact. If the 3D map of your ground was built before 6 August 2026, they are not ready yet. The first call triggers the fetch, and the next time the page loads they are there. If the row “Gebäude aus OpenStreetMap” shows a 0 with the note that they have not been fetched yet, that is exactly the case: it does not mean there are no buildings in your ground.
The distances are an adjustable assumption, not a legal value. 150 m for buildings and structures and 300 m for paths is only the preset. Hunting and firearms law are a provincial matter: what applies in your ground stands in the provincial act and in the lease contract, not in this map.
On top of that the data situation, unvarnished: the paths and the buildings come from OpenStreetMap, so they are maintained voluntarily, are not official and are not complete; what is missing there is missing here too (you can read it in again with the ↻ button in the 2D map). “Tracks and footpaths” are all footpaths from that data, from the inconspicuous trail to the long-distance route: whether a path is waymarked is not in that data. And the calculation runs horizontally on the ground on a grid of about 20 metres (the exact spacing is in the popup); the difference in height and the vegetation are not in it. The edge of a coloured area can therefore lie about one grid spacing out.

In the settings
The settings centre stays a compact side panel over the visible map. Its start page holds seven compartments; the search finds a control for you even when you do not know where it has been filed. Changes take effect at once. At the top left ‹ leads back to the overview, and ? explains the operation with a short video. Anyone currently sharing their position still stands in the popup at the ⚙ beside the 👥 Live button of the display menu.
- Bild & Effekte (picture & effects): brightness, the ground boundary, the surrounding land and the optical effects.
- Marker: since the end of August 2026 the panel 📍 Marker settings is divided into four sections, and the headings say who a value applies to:
- Handling · this device: Tappable (all markers or only the trail cameras), Info card locked, Name labels and Names only when selected.
- Size & visibility · this device: Size (50 to 200 %, starting at 150 %), Height above ground (0 to 200 %, where 0 means exactly on the terrain point), Opacity, Occluded by terrain and Hide beyond distance (0 to 2000 m, where 0 means unlimited).
- Stem · this device: Stem to ground, Stem thickness and Stem colour with an Auto button.
- Hunting ground wide design · applies to everyone in 2D, 3D and Planner: the same five marker presets as in the planner with a real preview, plus the border colour, the border width and how visible the border is. What you choose here is what everyone in the ground sees, in all three views.
- Wege & Gebiete (paths & areas): path thickness (5 to 250 %), the colours of all eight path types and the shared area categories.
- Jagdwerkzeuge (hunting tools): the wind source and its range, the distance rings with the line of sight and the eye heights, and all the settings of the safety layer.
- Wetter & Himmel (weather & sky): live weather, weather situations, the privacy switch, clouds, rain and atmosphere, plus the stars, the sun and the moon.
- Grafik & Leistung (graphics & performance): a preset from auto through low up to ultra, the render resolution, texture sharpness, terrain resolution, elevation data, ambient occlusion, bloom and edge smoothing, plus the size of the surroundings (2 to 12 km edge length). A changed value for the surroundings triggers a rebuild; the ground boundary is left untouched. Right at the bottom sits the small section Test: 🧪 Texture streaming tries out a new tile planner that brings the aerial image into focus faster as you zoom in, and 📈 Performance display shows readings at the top left, with the 📋 Copy diagnostics button below them for the chat. Both apply to this device only, reload the view once when you switch them, and can be turned off again at any time; what they do is explained behind the ? in the same row. They sit in the graphics settings under ⚙ so you can try both in the store app as well, not only in a browser. If anything looks odd on screen, simply switch it off again.
- Kamera & Hilfe (camera & help): the camera studio, feedback, the short video and resetting your personal 3D settings.
- Resetting is offered per compartment and for the whole device. Only personal 3D settings are removed; markers, paths, areas and other ground data stay as they are.
- Image sharpness: you do not have to worry about that. Your ground is always built at the best possible level, on every plan, and your device loads the variant it can carry. As you come closer the view keeps fetching finer aerial image tiles, and it does so for the whole visible section: the foreground at the bottom of the picture gets the finest level, because it is nearest.


The 2D map in everyday use
The map is the working tool: entering, measuring, drawing, printing. At a desk a bar with the main actions floats at the top centre, the display menu Display sits at the top left, and further functions are found under ⋯ More. On a phone everything becomes a bottom sheet at the lower edge: a tap on the grab bar unfolds it, a tap on the map pushes it away again.
When you fold away the panel at the top, the essentials stay visible: the ground name, its area in hectares and the state of open tasks. If there is no open task, it says all done. If one detail is not ready yet, the short line simply shows what is already available.
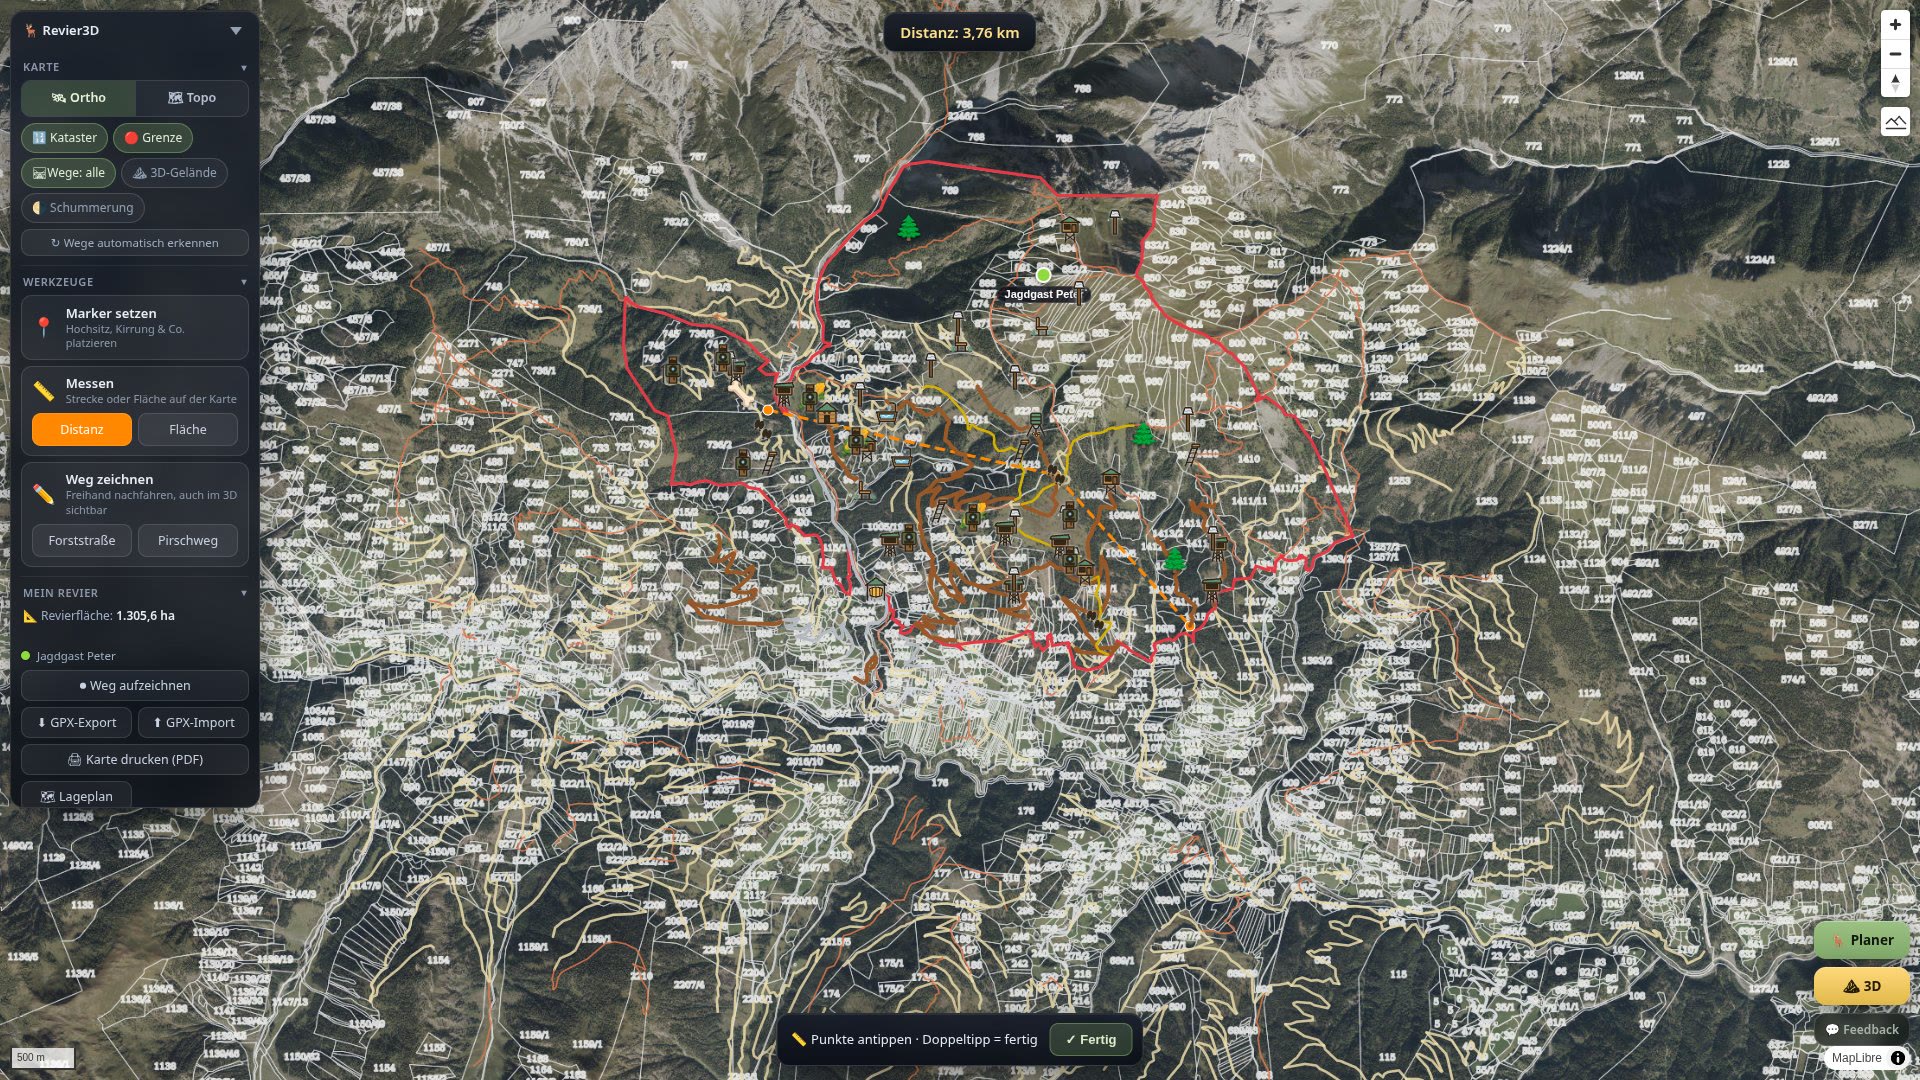 0:23
2D tools
0:23
2D tools

The display menu Display: base map and layers
The menu is divided into tabs: Layers for the base map and the layers, Objects for areas and markers and, where it exists, Official maps (explained above). In Layers, the controls are grouped by purpose and separated by thin lines. Controls for the map itself cover 🛰 Aerial and 🗺 Topo, 🔢 Cadastre and 🔴 Boundary, ⛰ Tilt relief and 🌗 Hillshade, as well as 🛤 Paths and 🌊 Watercourses. Another group covers content in the ground: 🟢 Areas, 📍 Markers, 🖌 Sketches and, when located cull record entries exist, 🦌 Culls. A separate group controls the red light with 🔴 Night.
The paths button is a plain switch: on shows all paths, the network from the map and your own lines; off takes all of it away. Which paths you see while it is on is set in the Objects tab under 🛤 Wege zeigen: all, hunting related (forest roads and your own lines, without footpaths and public roads) or only your own. That fine setting cannot override the switch; while it is off, the row shows that too. Watercourses shows rivers, streams and springs from OpenStreetMap where data for them is available in the ground; standing water such as lakes and ponds is not in it yet. It is the same file that the 3D diorama draws its water from. The ⚙ by markers opens the marker settings.
The group 🦌 Culls with its switch 🦌 Show displays animals culled and found-dead game as points on the map, coloured by species; found-dead game also carries a red rim. The year selector counts in hunting years, not calendar years: in Upper Austria, Styria, Tyrol and Vorarlberg the hunting year begins on 1 April, and a calendar year would cut the season in half. A tap on a point shows the details of the entry. The species legend gives the numbers. Entries without coordinates are not drawn, and the legend tells you how many those are. That is the most important sentence about this layer: someone with twelve rows in the planner and nine points on the map would otherwise take it for broken. A cull gets a place automatically if you enter it via the green button at the high seat; older stock and entries created in the planner without a seat have none.
While the red light is on, the strength choice Light, Medium or Dark also appears, see above.
The lists live in the tab Objects: under 🟢 Areas every area category on its own, with a colour dot, a name and a count, plus 👁 to show and hide it and 🔒 to lock it against tapping (the surface stays visible while it is locked). Below that 📍 Markers with the same kind of list per marker type. ↻ Refresh paths does not sit in the display menu but under ⋯ More: with it the map fetches forest roads, paths and roads for your ground again.


The tools
All the tools work the same way. When you tap one, the menu bar at the bottom becomes the tool bar: at the top it shows what you are doing and the live value (area, distance, metres of climb), below that the choice of type as symbol tiles and the fields for the emoji and the name. So you set everything before you draw. ✓ Done then saves directly. No second window opens that covers the map. As soon as you start drawing, the bar contracts and releases the map; the chosen type stays visible at the top. With ✕ you leave, with ↩ you take back the last step. On a phone the bar docks at the bottom, on a computer it floats as a slim capsule.
- While placing a marker, choose Add photos before saving. After Save marker, the photos are attached and its information card opens. If a photo cannot be sent, the marker remains saved and you can retry the upload.
- 🟢 Mark an area: you set the category, the emoji and the name beforehand in the bar, then you outline the area freehand. That works in several strokes: lift the stroke, move the map with two fingers, carry on drawing. The size in hectares runs along while you draw, at the top right of the bar. With ↩ you take the last stroke back, ✓ Done saves immediately. You can change the type while drawing too, using the type chip in the header of the bar, and afterwards just the same: tap a saved area, change the type, the name and the emoji in the popup, save. That works in both views, in the 2D map and in the 3D diorama, and for every area: a roe deer area becomes a red deer area that way. When the type changes, the colour and the symbol follow the new type as long as you have not set a colour or an emoji of your own. A mistyped entry no longer means deleting and drawing again. You manage your own categories in the 🎨 Marker settings or in the planner.
How you open a saved area: with a tap on its symbol in the middle, not on the surface. That is deliberate, otherwise an area card would keep opening unwanted while you move the map. If an area has no symbol and no displayed name, a tap on the surface still opens it, since otherwise you could not get in at all. If an area type bothers you anyway, you can lock it in the display menu 🎯 with the 🔒 next to its name: the surface stays visible, it just no longer opens a card. This applies in 2D and 3D together and stays saved until you lift it. - 🖌 Sketches: like a pen on the map, and meant for discussing a hunt: the direction of the beaters, stand numbers, danger areas. Five tools behind the tool button in the bar: ✏️ pen (freehand), ➡️ arrow (if you drag straight, it is straight; if you drag a curve, it follows it; the head always sits at the end), 🔤 text (tap the map, enter a label, for example “Stand 7”), ⬠ area (outline a region, it is filled semi transparently) and 🧽 eraser (tap a stroke, gone). Plus 6 colours and a colour of your own, 3 thicknesses and an opacity slider.
Drawing and moving the map: with ✋ you switch to moving, and with the tool button back to drawing. Two fingers always belong to the map: if you put down a second finger, your stroke is cleanly finished (it is not lost) and you can pan and zoom. ✓ Done means “I want to look now”: it switches to moving, and the sketch stays open. With ↩ you take back the last step, an erasure included.
A sketch applies to the whole ground, and all fellow hunters and official guests see it. The first stroke creates it automatically: nothing interrupts you, you simply draw on. To start with it is named after the date; with ✎ on the tile (or on the title at the top) you give it a telling name (“Ansitz Drückjagd” or “Totersuche 14.8.”, for example). In the overview 🖼 you see a preview, the author, the date and the number of strokes for every sketch; with 👁 you hide one for everybody without deleting it (handy for last year's driven shoot), and with ✕ it moves into the recycle bin and can be brought back for 30 days.
Sketches always lie on the map, even without opening sketch mode. In the display menu you switch them on and off for your device. Identical in 2D and 3D: the same sketch, the same colours, draped over the terrain in the 3D diorama. With an Apple Pencil or a Surface Pen the stroke width also varies with the pressure. - 📏 Measure (distance) and 📐 Measure size (the area of a region), two separate buttons. Tap the points; the result stands right in the tool bar and grows with every point. With ↩ you take the last point back. You close an area by tapping the starting point again (on a desktop a double tap on the last point also works). After closing, the result stands as a block in the bar (the total distance with its sections, or the area in hectares and square metres with the perimeter), and the tool stays on: the next tap on the map begins a new measurement, and only ✕ ends measuring.
- ✏️ Draw a path: as direct buttons there are Forststraße (forest road) and Pirschweg (stalking path); which of the two you tap is only the preselection. In the bar all path types stand as tiles with their map colour (forest road, stalking track, stalking path, track, boundary guide line). So you switch in the middle of drawing without leaving the tool. One finger draws, two fingers move the map; ↩ deletes the path drawn last in this session. You give the path a name right in the bar before you draw: it applies to the next path and is empty again afterwards, so that not every stroke of a session is called the same. Leaving it empty is fine too, and you can name a path later at any time by tapping it. All the paths appear in the 3D as well.
- 🗺 Edit the boundary (the only tool not directly in the bar, but under ⋯ More): tapping parcels is enough, the same tapping as during setup. With ◯ Trace around you add the parcels of a whole area in one pass. Borderline cases glow golden and want to be tapped. For large areas there is 🖌 Add and 🧽 Erase. The tool 🛣 Road & stream clears up narrow public parcels: if your ground consists of several pieces because of a road that is not yours, a tap on the road joins the pieces (green); a road that belongs to your own parcels is taken out by a tap (red). A tap on a piece that is already green or red undoes the action. Via 🛟 Backups you can get back to earlier states of your boundary at any time.
🌲 The forestry tools. If you do not only hunt but also manage the timber, the open type catalogue of 📍 Place a marker and 🟢 Mark an area carries the category Forst (forestry). It is there from the start, there is nothing to unlock: nine forestry marker types (conspicuous or diseased tree, suspected bark beetle, hazardous tree, windthrow and snow break, biotope and habitat tree, timber stack, skidding and storage site, path and culvert damage, fence and game protection damage) and eight forestry area types (forest stand and compartment, damage and beetle area, windthrow and snow break area, afforestation and young growth, tending and thinning, harvesting and working area, indicator and control plot, game protection and fenced area). A purely hunting ground simply never taps the category. If you do not want to see it at all, hide or delete the types under Planner → ⚙ Settings → Marker set; deleted stays deleted.
Attaching photos and videos
You can attach photos and videos to a marker, a damage case, a follow-up search, a maintenance job and a cull record entry. The evidence a hunting ground lives on: the rotten rung on the high seat, the browsing in the young growth, the strike site, the animal culled.
- While placing a marker, choose Add photos before saving. After Save marker, the photos are attached and its information card opens. If a photo cannot be sent, the marker remains saved and you can retry the upload.
- On an existing entry you tap it and then the + tile in the photo strip. A tap on a picture opens it large, and a video plays right there.
- In the large picture you can zoom in: on a phone pinch with two fingers, then move the picture with one finger; a double tap zooms in at the tapped spot and out again. On a computer the mouse wheel. That is how you read the antlers, the browsing damage or a number plate out of the photo. Swiping pages on as long as you have not zoomed in; the next picture starts unmagnified again. It works the same everywhere: on markers and entries, on the trail camera pictures and in the tab 🖼 Photos. Only videos stay unmagnified, there the fingers belong to the playback controls.
- Your phone shrinks the picture before it sends (1600 px on the long edge). In the woods on a poor connection that is the difference between “it works” and “it does not”.
- Videos (MP4 and MOV) go up unchanged, up to about 95 MB per file, so more wifi than high seat. A tip for the iPhone: under Settings, Camera, Formats set “Most Compatible”, otherwise fellow hunters with an Android phone on other devices cannot play some videos.
- No fixed number per entry: the storage is the limit. Photos, videos, receipts and trail camera images share a common storage of 8 GB per ground, with Pro it is 50 GB, and in the 7-day trial 1 GB. The “Speicher” card in the planner overview shows how full it is, in two parts: your own storage at the top (photos, videos, receipts, trail cameras), and below it the ground data (3D map, boundary, terrain and aerial imagery). This is on us and does not count towards your quota, however large your ground is. Deleted entries stay 30 days in the recycle bin and keep counting there until the ground management empties it. If the storage still fills up, the trail cameras keep sending: the oldest camera images are then deleted for good automatically (like a ring buffer), never your own photos, videos or receipts. The ground management gets one e-mail about it, and the cameras tab shows it permanently.
- Who may: anyone who may create the entry itself, so the team over the shared link as well, without an account of their own. Whoever may enter a bait site may also photograph and film it.
The high seat diary has no photo strip yet. It will get one later.
Position, recording, GPX and printing
🙋 Wo bin ich? and 📡 Live-Standort senden sit directly in the bar. Everything else is under ⋯ More; at the bottom there is also 📐 Revierfläche (ground area), live while drawing and in the boundary editor.
- 🙋 Wo bin ich? shows you your position on the map, 📡 Live-Standort senden makes it visible to your fellow hunters.
- ⏺ Record a path: let the stalking path be written along by GPS. You enter the type and the name beforehand, then you can put the phone in your pocket and set off. The number of points runs along in the bar. ⏹ Stop & save ends the recording and files the path straight away. (Formerly the name question came right at the end, that is, when the phone had long been put away.)
- ⬇ GPX export and ⬆ GPX import, for Garmin and the like.
- 🖨 Print the map (PDF) opens a setup popup: format (A4/A3/A2), orientation, base map (ortho or topo), title, every layer on and off individually (boundary, areas, paths by type, markers by category), and for the markers you also choose the symbol style (icons or ⬤ Punkte, dots by category). Plus labelling (names, legend, scale bar, north arrow), the margin around the ground (how tightly the boundary zooms onto the sheet) and how pale the surroundings are. A live preview stands right at the top and redraws itself with every setting before you create the PDF. Since September 2026 the preview scrolls along instead of sticking to the top edge: on a phone the pinned picture ate exactly the room that the many controls below it need.
- 🗺 Site plan: deposit your existing ground plan as an image or a PDF. Only the shoot captain may upload it.
- 🔴 Night mode (red light) for the high seat. You switch it on with the 🔴 Night switch: in the 2D map in the Display menu, in the 3D diorama under ⚙ Settings, in the planner behind the ? next to the display switch in the header; the strength (light / medium / dark) you set in the same place. The mode applies in all three views and stays on when you switch, more on that above.
Placing markers
There are around 30 types of estate furniture: high seat, box seat, ladder high seat, ground hide, hunting lodge, bait site, feeding site, boar feeder drum, salt lick, water trough, trail camera, wallow, run, harbouring area, carrion bait site, chiller, gralloching site and more. On top of that come species for sightings. You choose the type in the tool bar while placing; type, name and position you change later by tapping the marker.
Reporting found-dead game and a wildlife-vehicle collision: if you place a marker of these two types, the app speaks up while you place it and offers 📧 Report: that opens a ready-made e-mail with the type, the label, the date, the GPS coordinates and a map link, to forward to the municipality or the police station. You find the same link in the marker itself afterwards at any time, plus 📋 Text kopieren if you would rather report another way. Choosing the recipient: the form for wildlife-vehicle collisions and found-dead game has a selection list Verständigte Stelle (the body notified) in which the recipients per province are already listed; you add your own recipients (a police post, the hunting rights holder, the district authority) via + Eigene anlegen. If you pick a recipient, the e-mail is addressed to them directly and you do not have to look up the address yourself. The recipient list belongs to the ground, and everyone in the ground sees it.
The card of a placed marker. If you tap a marker, its info card opens: the name and the type at the top, below that the most recent photo large and the rest as small tiles with a +3 if there are more. With 📷 you take a new photo directly, and the + next to it fetches one from the gallery. Right at the bottom stands the one action that belongs to this type of marker: at seats 🦌 Erlegt hier eintragen (record a cull here), at found-dead game and collisions 📧 Report. Everything else lies behind the ⋯ at the top right: open in the planner, route, and set apart below that ✏️ Bearbeiten, ✥ Verschieben and 🗑 Löschen. On a phone the card slides in from below instead of floating above the marker: that way it does not cover the spot you have just tapped. It looks the same in 2D and 3D.
Trail camera markers in the 3D. If you tap a marker in the diorama that has a trail camera assigned to it, that camera's image gallery opens full screen. At the top you choose with Spalten 1 2 3 4 how large the pictures should lie: one column for looking through, four for the overview. The device remembers the choice. A tap on a picture shows it large, and with ‹ › you page on, on a phone by swiping. In the large picture you can zoom in with two fingers and then move it, a double tap zooms in at the tapped spot and out again. The button 🦌 Im Planer takes you to the tab 📷 Wildkameras, where one row filters by cameras, species and time of day and the small arrow holds the period, see the analysis and export it as CSV or as a complete PDF report. If a camera connection has expired, the note about it stands above the pictures.
Locking the map. When you are out in the ground or hand the phone to a guest, you do not want deleting and moving to be one tap away. For that the display menu has 🔒 Lock cards (in the 3D under 📍 Marker settings as Info card locked). When it is on, the ⋯ disappears from the info card. Photos, taking pictures and the type's own action remain. This applies in 2D and 3D together and stays saved until you lift it. That is something different from the 🔒 on areas: there the surface stops being tappable, here the marker stays tappable and only loses its tools.
The shared marker set. The ground manager opens Planner → ⚙ Settings → Marker set, sees a clear preview and first chooses one of five presets: Keep previous look, Outdoor, Detailed, Subtle or Overview. Newly created grounds and new marker sets start with Subtle: the bare symbol without a background pad, and in the 3D it then sits firmly on the ground instead of on a stem. The same five presets, preview included, are also in the 📍 marker settings of the 3D. The choice applies across the whole ground, so it also applies to everyone working through the ground link. A ground that has already chosen another preset keeps it. Fine settings offer circle, square, pin and shield shapes, a fixed colour or the category colour, background and border opacity from 0 to 100%, border width, symbol size and shadow. The preview can be checked on an aerial image, a topographic background and a dark background. The result immediately applies together in 2D, 3D and the planner.
- Individual types: change the name, category, emoji or custom image; hide rarely used types while placing; or choose a separate design for just that type. Hiding never removes markers that have already been placed.
- Categories and order: colour and sort categories, offer or hide a complete category, and move types up or down within a category. Search quickly finds “high seat” or “camera” even in a large set.
- Type packages: Compact, Standard and Extended only add types that are missing. They never delete or overwrite your work.
- Personal stays personal: every member chooses their own marker size in 2D. In 3D they can also set height, opacity, the stem to the ground, name labels and visibility distance. These preferences never alter the shared marker set.
On a phone
On a smartphone the menu sits as a large bottom sheet at the lower edge with a thick golden grab bar and an open/close pill button. A tap on the grab bar unfolds it, a tap on the map pushes it away again. All the buttons and rows are large enough to hit safely, even with thick fingers.


The planner: the administration
Everything the shoot captain and the team need over the year, in one place. The planner is grouped into six areas: 🏠 Today, 🦌 Game, 🛠 Ground work, 📊 Figures, 📷 Cameras & photos and ⚙ Settings. On a phone you first see a list of every tab you can see, sorted under these six headings; a tap on a tab opens it, and ‹ Planner at the top brings you back to the list. On a computer, from 900 px window width, the same grouping stands as a narrow sidebar on the left, with the tab content beside it. The selected tab stands in the address (for example /planer/#wartung): that way you can link a tab directly or file it as a bookmark. If you are a member of several grounds, the name of the ground stands at the top of the planner header as a button with a small ▾: a tap on it opens the list of your grounds, and a tap on an entry switches straight to it.
On a phone, list tabs start with the existing entries: the forms for new tasks, culls, sessions, bookings, maintenance, feeding, follow-up searches, incidents, warden rounds and game-meat items are folded initially. Tap ➕ … to open a form. After a successful save it closes again and highlights the new row; an error leaves the form and its contents open. In the game-meat tab only the long province-rules text is folded as well, with the province still named in its heading. The desktop layout stays as before.
The planner runs in 🔴 night mode too, if you have switched it on; handy for entering the bag after a session without dazzling yourself. More on that.
Display mode: compact, standard or full
On a computer, the direct Compact | Standard | Full switch sits in the header. On a phone, one button spells out the current state, for example View: Compact ▾; a tap opens the short choice with 7, 13 and up to 19 tabs. The short video and three explanation steps appear only on the first visit or when you explicitly open the explanation in settings. If you are a member of several grounds, a small ground button with a shortened name uses the remaining space in the same header row. One tap and the planner switches immediately, for the whole ground and all its members: if the ground management switches over, everyone in the ground sees the same mode. Anyone who is not the management can switch a preview locally and gets a note that it applies only to them.
The first time you open the planner, that same explanation appears automatically and invites you to choose. If you dismiss it, it comes back next time - only a final choice switches it off for good.
- Compact: 7 tabs, that is overview, tasks (as a simple note field), statistics, trail cameras, trail-camera statistics, photos and settings. Everyday hunting without the technical ballast. Recommended for most people.
- Standard: 13 tabs, plus the high seat diary, cull & bag, maintenance, feeding, damage & incidents and follow-up searches. On top of that come the province banner, the deadline calendar, the unfoldable open season section and the § and “own target” marks in the cull plan.
- Full: up to 19 tabs, plus game meat, bookings, wardening, bookkeeping, trophies and population where they are visible for your role or ground. Wardening (the warden rounds) is visible in the full view for everyone else; anyone who holds the role Aufseher (game warden) sees the tab in every display mode, compact and standard included. On top of that come sending the compliance record and the cull record by e-mail, the baiting compliance box in the feeding tab and the member administration.
In compact mode, tasks is set to “note only”: a free text field instead of the to-do list. When you switch to standard or full the list comes back, and no data is ever lost. Trail cameras are included in every plan. The mode and the plan are two different things: the mode says how much the planner shows, the plan says what you may use. On full, Basic therefore takes no tab away from you; the Pro tabs (game meat, bookings, wardening, bookkeeping, trophies, stock) stand there behind a lock, and a tap on one leads to unlocking. The setting applies per ground: are you a member of several? Each has its own mode.
Standard and Full are marked as beta. Both views are still being tested, so the button carries a small Beta label, and the first time you switch there you get one short note. If something looks wrong, report it straight from that note with Report a problem; it is the same route as 💬 Feedback in the ❓ menu. Compact is the proven view for everyday use.
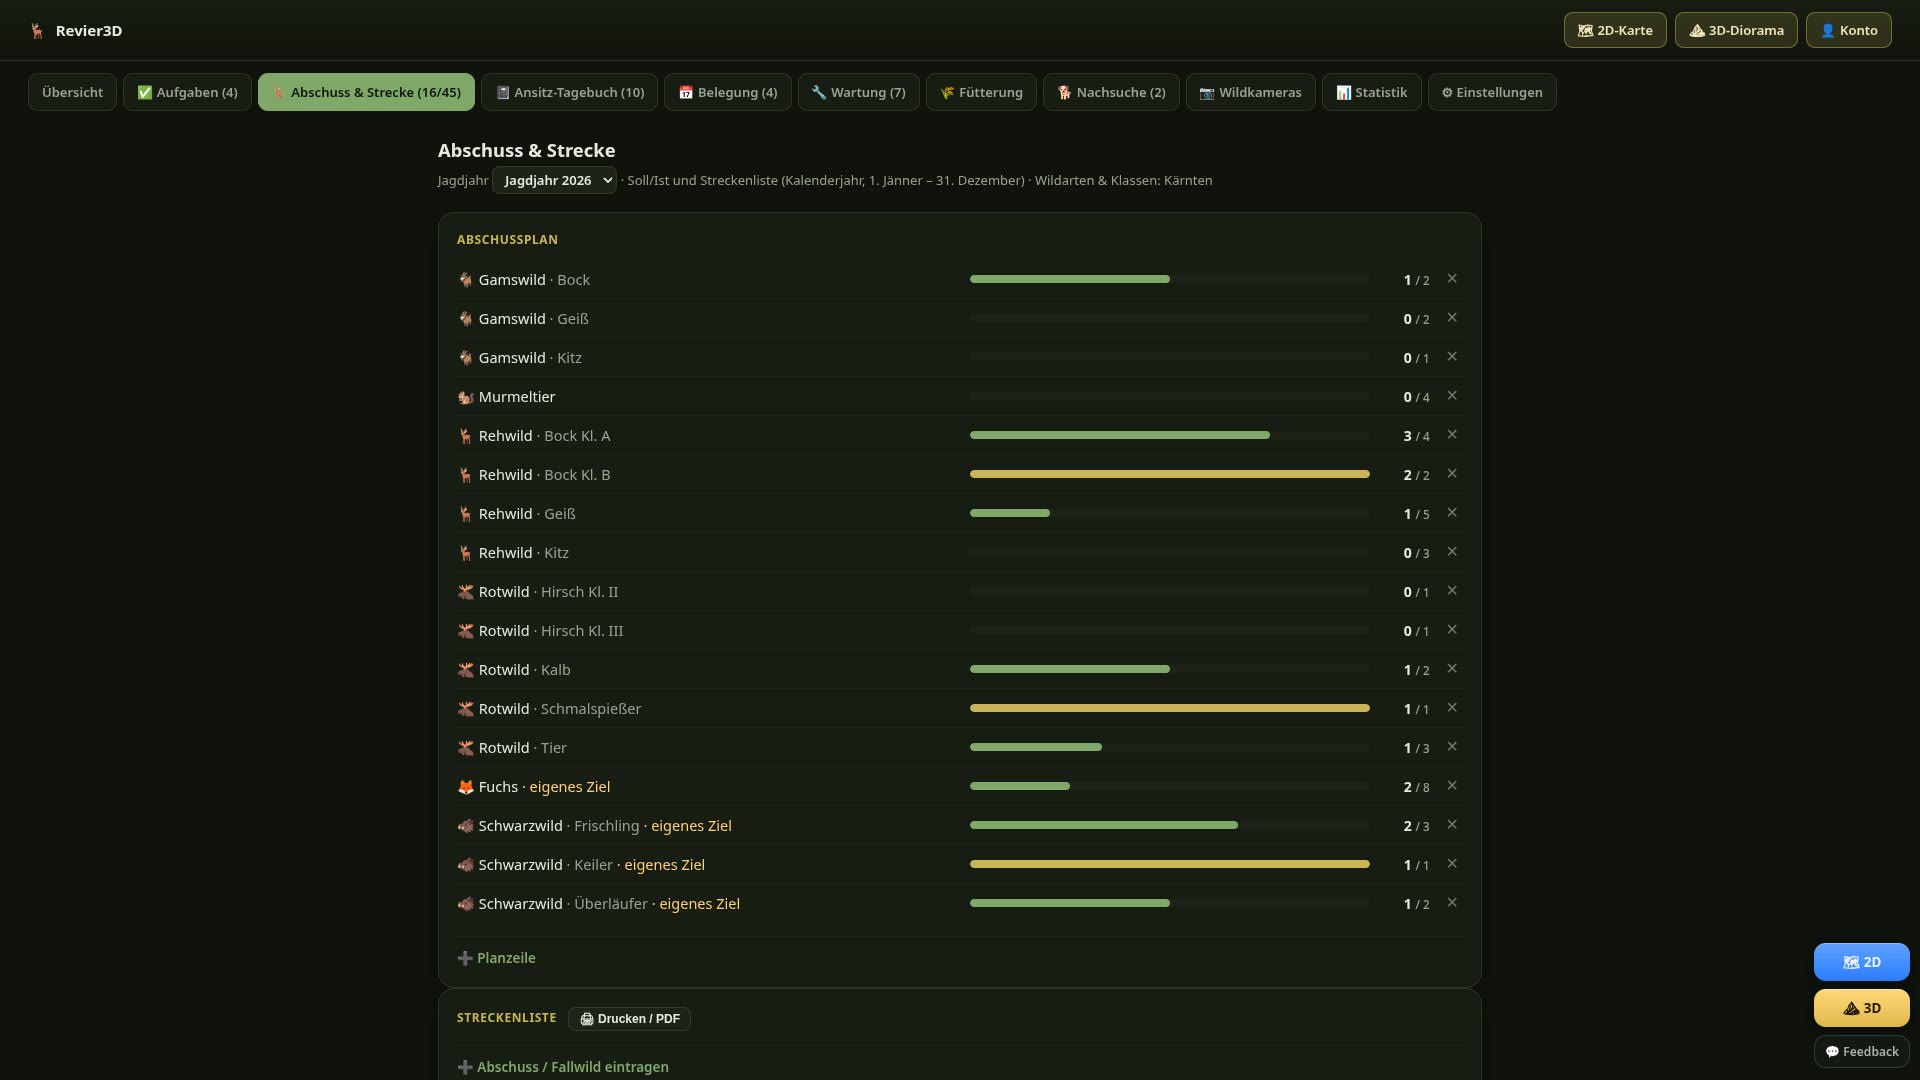 0:08
Planner tour
0:08
Planner tour

Files
In the planner, Files brings together shared documents and permitted marker, journal and trail camera pictures. Pictures appear in the Photos and Trail cameras folders, with a separate folder for each camera. Newest entries appear first. Search finds files across these folders within the selected area. Use Add next to the search field to choose photos or files from your phone. The All / Photos / Documents filters help you find them again. Tap a file to open it.
Your files appear as soon as the folders and your own documents are in. Photos, camera images and accounting receipts load alongside; while one of them is still coming, a quiet line above the list says so, for example Loading camera images …, and the counts grow with it. If a source fails, that same line says so and offers Try again, while the rest of your files stay usable. A source that did not load shows no half list.
In District leaders only, leaders with accounting access can also find receipts from all years in the Accounting folder. These link to the existing receipts; their access permissions and original files are preserved.
PDF, Word in DOCX format and Excel have reading previews. To edit a file or open another format, choose Save original or Share and open it in a suitable app. Original files remain unchanged and can be up to 50 MB. Photos also get a small preview.
Use ⋯ to manage your own files. District leaders manage all files and folders; their District leaders only area is hidden from other members and guests. Deleted files are available in Trash. Linked pictures stay connected to their original entry.
If you delete your account, files uploaded for the team remain available to the other members of a shared district. The direct account link is removed; this does not automatically anonymise the file contents.
Keep on this device saves an encrypted copy of a selected shared file for use without a connection. This requires your account. Leadership documents stay online. Before going out, check Available on this device, as the device can remove browser data. Remove from device only removes the local copy; signing out or changing districts also clears the selection.
The tabs in the planner
Everything without the (Pro) mark belongs to the Basic plan. What is marked (Pro) you also see on Basic, but behind a lock: a tap on it leads to unlocking.
- 🦌 Cull & bag: the cull plan with the species classes of your province, target and actual per class, plus the cull record. Both printable as a PDF, with a note about the official reporting route of your province (Lower Austria: the official form; Upper Austria: the hunting database). At the top of the tab stands a prominent province banner with the coat of arms and a note about the sources. The button 📄 Annual report (annual report) creates a summarising PDF for the hunting association or the annual general meeting: cull plan fulfilment, a mirror of the bag, maintenance, damage, trophy highlights and a trail camera overview in one document. The annual report is not an official record (that stays the cull record), but an overview. You can download it or send it straight to an address by e-mail.
What a cull record entry holds: the date and the time, the species, the class, the sex, the estimated age, the weight together with what it refers to (gralloched, in the skin, butchered, live), the method of culling (high seat session, stalking, driven hunt, follow-up search, trapping), the seat, the shooter, the firearm and calibre, and whether and when you reported it to the authority. None of that is compulsory apart from the date and the species: empty means “not recorded”, and on a record that is more honest than a guessed figure. The time is the most important addition: without it you cannot show that the shot was taken within the permitted hours of the day, and that is exactly what the app shows you to the minute in the 3D HUD.
The green button at the high seat enters the place along with it. If you tap a seat on the map and there tap 🦌 Erlegt hier eintragen, the entry gets the coordinates of the seat, the current time and the method “Ansitz” (high seat session) automatically. That is why the button is now called Record (now). In the detail of an entry the place then stands as a map link, and only with that place does the animal appear on the layer 🦌 Culls in 2D and 3D. The species list in this button is the same as everywhere else, namely that of your province: a capercaillie run over on the road can be entered as found-dead game with it too.
From the cull onward into the game meat and the trophy. Tap a cull record entry and two buttons stand at the bottom: 🥩 Ins Wildbret (into the game meat) creates the game-meat case from this animal, with the species, the date and the shooter already filled in; once it has been taken over, the same button reads 🥩 Im Wildbret ansehen (view in the game meat) and takes you there. Taking it over twice is not possible: a second attempt simply opens the entry that already exists. With found-dead game the button is absent, because from your own ground it takes no food route. Beside it, 🏆 Trophäe eintragen (record a trophy) creates a trophy for this animal. Both cards say at the top where things stand: “taken over (no. 12)” or “not taken over yet”, “none recorded” or “two recorded”. A trophy may hang on one animal more than once (antlers and tusks are two keepsakes), so that one is not locked.
Short cut while recording: the cull form carries the tick 🏆 Trophäe (trophy). With it set, the trophy sheet opens straight after saving, prefilled with this animal. Out of signal the cull is kept and goes out as soon as you have reception again; you then add the trophy afterwards from the cull record entry.
The printout of the cull record is landscape, because thirteen columns would no longer be readable upright.
Found-dead game is shown separately: if found-dead game is included in a plan row, the row shows that (“2× Fallwild”), and on the compliance record it has a column of its own. Whether found-dead game counts towards the plan at all you set under ⚙ Settings → 🏰 Ground & hunting year: in Lower Austria it counts (§ 83 NÖ JagdG), other provinces handle it differently, and some hunting associations reckon more tightly. It is displayed in both cases: the figure on the record should be checkable.
A plan row without a class covers everything that has no row of its own: if you keep the plan roughly (“roe deer: 20”) and record the bag finely (“roe deer, buck”), you still get the right actual figure. If you create a separate row “roe deer, buck” next to it, the buck counts there, and not twice.
When you change province the class names change (Carinthia runs “Bock Kl. A” and “Bock Kl. B” for roe deer, Lower Austria only “Bock”). If an existing class no longer fits in the new province, the app says so while switching and names the entries affected. Nothing is lost in the process: switching back restores everything. - German original, awaiting specialist review (open seasons, PLAN-I18N-GERUEST §10)📅 Schusszeiten aller neun Bundesländer, klassengenau, mit Warnung, wenn du etwas in der Schonzeit einträgst. Die Tabelle nennt Paragraf- und LGBl-Fundstelle der jeweiligen Landes-Verordnung (geprüft gegen das RIS, Stand Juli 2026; Angaben ohne Gewähr). Sie sitzen im selben Reiter, gleich unter der Streckenliste.
- 🥩 Game meat (Pro): accompanies the Austrian game-meat workflow from the carcass through examination and trichinella sampling to one or more handovers. Every case belongs to an animal from this hunting ground. You can link it to the bag or manually record an older animal from the same ground; this is not a cross-ground journal.
At the top of the tab stands the list “Erlegt, noch nicht erfasst” (culled, not recorded yet) with the number behind it: every animal from the bag that has no game-meat case yet, with a year selector of its own. A tap on an animal creates the case, with the species, the date and the shooter already filled in. Once everything is worked through it simply says “Jedes erlegte Stück ist erfasst.” (every culled animal is recorded). If an animal has neither a seat nor a coordinate, the app asks once for the place of the cull in your own ground: without a place the case cannot be evidenced later.
The examination is confirmed by a trained person (kundige Person). The app records the person's qualification and official or association number but neither grants nor verifies them. A draft is not an unremarkable finding: the observations must be explicitly confirmed. Findings of concern or abnormal behaviour before the kill direct the animal to the official-inspection route and prevent release for direct supply.
Trichinella sampling has its own workflow. Where a sample is required, you record the sampler, the scope of authorisation applicable under authority and laboratory rules, sampling time, site and quantity, container or seal, laboratory and dispatch. The reviewed material does not establish one uniform Austrian official role called “trichinella sampler”: in Lower Austria it is a registered trained person with additional training, while authority and laboratory routes may differ elsewhere. Species, the person's actual authorisation and laboratory instructions determine the sampling site and amount. You enter the laboratory result manually as pending, negative, positive or inconclusive and may attach the report as a PDF or photo. Revier3D does not extract the result automatically and has no laboratory connection. Before supply or placing on the market, a pending or inconclusive result prevents release; a positive result blocks any food use and points to the competent authority. Exclusive private domestic consumption is legally distinct from placing on the market; for susceptible or unresolved species Revier3D nevertheless requires a negative result as an additional product-safety rule, not as a claim that identical statutory own-consumption duties apply throughout Austria.
Names and official forms vary by Austrian province and route. In Lower Austria, direct supply of whole large game uses in particular the inspection block Bescheinigung Wildkörper und Eingeweide and the Wildbretanhänger; other provinces use terms such as Wildanhänger, Wildbretanhänger or Wildplakette. The federal numbered certificate attached as a tag concerns that large-game route. Revier3D therefore does not require such a large-game document number for recognised wild birds and lagomorphs; an unknown free-text species remains subject to the stricter document check. For delivery to a game-handling establishment, the official declaration may, where the statutory conditions are met, accompany several jointly identified carcases. Revier3D displays notes, reporting routes, retention information and sources for the province of the current hunting ground and records the official identification or certificate number you enter. The app never issues or verifies that number; its own sequential number is internal only.
The output is a register and form-filling aid based on the stored data, trichinella sample documentation, and an annual report for this hunting ground. It is expressly not an official form and not the complete personal annual return of a trained person who has also worked elsewhere. Revier3D does not submit anything automatically to an authority, hunting association, provincial reporting system or laboratory. The official form, provincial instructions and competent authority remain decisive for certification, labelling, reporting and retention.
Pro plan, behind a lock on Basic. The tab itself is shown in the full view. - 🏆 Trophies (Pro): your antler rack in the cloud. Every buck, every chamois beard, every cast antler can be recorded with a photo, a date, the shooter, CIC points and a medal (🥇🥈🥉 by the international CIC thresholds). The sheet asks for the measurements of the species in question, the unit stands in the field itself, and all of it is voluntary: what you do not measure you leave empty, and empty means "not taken", not zero. From the measurements the sheet works out a non-binding CIC preview (↻ errechnet 118 (unverbindlich), calculated, non-binding) and offers Wert übernehmen (take the value over). The preview is never saved by itself, and a recorded official assessment always wins: as soon as the points, the assessor and the date are there, the sheet shows ✓ amtlich (official). If a measurement is still missing, it says which one. For species with no formula on file there are measurement fields but deliberately no calculated points and no medal: a guessed medal would be worse than none at all. You can enter points from the association's assessment sheet there by hand at any time or add them later; the medal is then proposed automatically from them. Plus a storage place (“Schrank 3, Fach 1”, for example) and a remark. A trophy can be linked to a cull record entry, but need not be: cast antlers, winter finds and culls by guests have no bag row. The trophy register with all its entries can be exported as CSV, and the statistics tiles at the top show the distribution of medals and the top 10 by CIC. Only the ground management and the game wardens may delete (into the recycle bin), since trophies are inventory-like. Pro plan, behind a lock in Basic mode. The tab always appears for the ground management; everyone else sees it as soon as the first trophy has been entered.
- 📊 Population (Pro): head counts and camera activity are deliberately separate. A head count appears only as a documented estimate by ground management, with its basis, date and an optional note. Individual observations record species, class, number, date and source, but repeated observations may concern the same animal and are therefore never silently added up. Trail cameras separately show the RAI: independent hourly event blocks per 100 camera-nights actually covered during the last 90 nights. This is an activity and comparison value, not a head count. People, vehicles and other camera categories only appear in the activity section, never as game population.
- Overview with the ground at a glance and the 🎯 high seat forecast over seven days. At the top of the tab stands the province banner with the coat of arms as well, so that it is immediately clear which legal basis applies. The rating of the forecast comes from wind and rain, optionally from the moon phase too (adjustable); the sun times stand beside each day.
German original, awaiting specialist review (reporting deadlines, PLAN-I18N-GERUEST §10)⏳ Meldefristen: Läuft in den nächsten 30 Tagen eine Meldefrist deines Bundeslands ab, steht ganz oben im Tab ein Banner. Es nennt die Frist im Klartext, den Paragrafen, an wen zu melden ist und wie viele Tage bleiben; bei Fristen, die am einzelnen Abschuss hängen, auch, wie viele Einträge noch nicht als gemeldet markiert sind und wie viele davon schon überfällig. Hinterlegt sind alle neun Bundesländer. Ist nichts fällig, bleibt das Banner ganz weg: ein Dauerhinweis wird nach zwei Tagen nicht mehr gelesen. Gezählt wird nur das laufende Jagdjahr, sonst schleppt ein Revier seine ganze Vorgeschichte als „überfällig" mit sich herum.
Abgehakt wird eine Abschussmeldung im Streckeneintrag, nämlich über das Feld An Behörde gemeldet am. Solange es leer ist, zählt der Eintrag als offen. Einen eigenen Haken am Banner gibt es bewusst nicht, sonst stünde dieselbe Aussage an zwei Stellen.
Zwei Dinge sagt der Banner mit Absicht nicht. Läuft eine Frist in Werktagen (Steiermark: sieben Werktage ab dem Abschuss), nennt er die Frist, aber kein Datum: ohne geprüfte Feiertagsliste wäre jeder Tag geraten, und zu streng ist genauso falsch wie zu milde. Und steht in deinem Revier ein Bundesland, für das keine Fristen hinterlegt sind, bekommst du den Hinweis, im Landesjagdgesetz nachzusehen, und keine Zahl: lieber keine Frist als eine erfundene, auf die man sich verlässt. Alles ohne Gewähr und ohne Rechtsauskunft, maßgeblich ist das geltende Landesjagdgesetz, und Bescheide oder Verordnungen der Bezirksbehörde können abweichen. - ✅ Tasks: to-dos with due date, priority and an assignee, plus a free note field for the ground. A recurrence turns jobs such as checking a high seat into repeating tasks; completing one automatically schedules the next date. My, Open, Overdue and Done keep the list short. The 📌 Today & upcoming overview combines tasks, bookings, maintenance, feeding rounds and important deadlines for the next seven days. Since September 2026 the open objections from the wardening tab stand there too, in red and right at the top: they have no due date and so fall through no seven-day window, because “open” simply means somebody still has to go there. A tap takes you into the control round.
- 📓 High seat diary: record a session with the seat, the duration, the hunter and the observations. The weather and the moon phase are added automatically.
- 📅 Bookings (Pro): who sits when on which seat, so that nobody gets in anybody's way. If the seat is already reserved for the same day and the same time of day, the app says so when you save and names the person; it saves anyway: on a double seat, during a driven hunt or with a guest hunter in attendance, the double booking is intended. Above the list stand two views: 📅 Kommende shows what is still to come, ↩ Rückblick the last 90 days, for the question of who actually sat where and when. Pro plan, behind a lock on Basic; it is shown in the full view.
- 🔧 Maintenance: the safety check at the high seat, the bait site, the feeding site and repairs, each with a due date. The quantity field is called “Verbrauchtes Material” (material used) and means exactly that: two boards, six screws, a metre of roofing felt. Amounts of feed do not belong here but in the feeding tab; this is about the state of the installation and what you used up on it.
- 🌾 Feeding: keep the stock per feeding site, enter refills, and the supply counts itself down. Plus feeding rounds with a fixed responsibility and interval: create it once, and after that a click on “Durchgeführt” (done) is enough.
Capacity, unit and consumption are changed at the site itself. Tap a feeding site and then edit, and right at the top stand Kapazität (Fassungsvermögen) (capacity), Einheit (unit: kg, l or pieces) and Verbrauch pro Tag (nur Automat) (consumption per day, automatic feeders only). Before that the three could only be set while refilling, and a capacity typed in wrongly could not be corrected at all without inventing a refill that never happened.
German original, awaiting specialist review (baiting law, PLAN-I18N-GERUEST §10)⚖️ „Kirrung: was dein Bundesland erlaubt" heißt die Karte unter der Futterstellen-Liste. Sie zeigt für dein Revier, wie viele Kirrstellen zulässig sind, welche Menge vorliegen darf, gegen welche Fläche gerechnet wird und mit welchem Paragrafen. Hinterlegt sind alle neun Bundesländer, eine gerechnete Stellenzahl gibt es aber nur in fünf: Niederösterreich, Burgenland, Kärnten, Oberösterreich und der Steiermark. In Tirol, Salzburg, Vorarlberg und Wien steht keine Zahl, sondern der Gesetzessatz im Wortlaut. Das heißt hier ausdrücklich nicht „ungeprüft", sondern: dort nennt das Gesetz keine. In Salzburg und Vorarlberg ist die Kirrung überhaupt verboten und nur mit Bescheid bzw. auf behördliche Anordnung zulässig, in Tirol ist jede Ankirrung von Rot- und Rehwild 14 Tage vorher anzuzeigen, ohne dass eine Obergrenze festgelegt wäre, und Wien kennt gar keine allgemeine Kirr-Regelung. Wie weit die Länder auseinanderliegen, zeigt das Nachbarbeispiel: die Steiermark erlaubt eine Kirrstelle je angefangene 100 ha, Niederösterreich drei. Deshalb steht in der Karte immer nur dein Bundesland und nie ersatzweise das des Nachbarn.
Was eine Station wirklich ist, sagst du selbst. Tippst du eine Futterstelle an, wählst du unter Betriebsart zwischen Kirrung, Ablenkungsfütterung, Notzeit- oder Vegetationsfütterung, Salzlecke und Luderplatz. Salzlecke und Luderplatz sind rechtlich keine Kirrung und zählen deshalb nie mit; in Salzburg steht das ausdrücklich im Gesetz (§ 66a Abs 5). Sagst du nichts, leitet die App die Betriebsart aus der Markerart ab und schreibt auch dazu, dass sie das getan hat: ein Kirrautomat ist eine Kirreinrichtung, eine Salzlecke eine Salzlecke, und bei einer schlichten Fütterung bleibt sie offen, weil aus der Markerart nicht hervorgeht, ob Ablenkung oder Notzeit gemeint ist.
Manche Regel rechnet nicht gegen die Reviergröße. Niederösterreich rechnet die Rotwild-Kirrung gegen die Waldfläche, das Burgenland gegen Wald-, Schilf- und andere unproduktive Flächen. Diese Flächen kennt die App nicht von selbst, deshalb steht in der Karte ein Feld zum Eintragen. Solange es leer ist, rechnen wir bewusst nicht und zeigen nur den Gesetzestext. Der Grund steht in einer Zahl: bei einem 800-ha-Feldrevier mit 60 ha Wald und Schilf ergäbe die Reviergröße 24 statt 3 erlaubten Kirrungen. Eine zu hohe Zahl führt in die Verwaltungsstrafe, eine fehlende nur zum Nachschlagen im Gesetz.
Zu viel wird gemeldet, nicht gesperrt. Liegst du über der zulässigen Zahl, sagt es die Karte, und beim Eintragen einer Nachfüllung kommt der Hinweis samt Paragraf noch einmal. Gespeichert wird trotzdem, genau wie bei der Schonzeit-Warnung im Abschuss-Reiter: die App führt dein Revier nicht, sie sagt dir, was gilt. Bescheide und Verordnungen deiner Bezirksbehörde können von jeder dieser Zahlen abweichen, und die Karte sagt das auch. In Oberösterreich zeigt sie bei Revieren unter 200 ha die kleinere von zwei möglichen Zahlen und den Gesetzeswortlaut daneben: der Satz ist in zwei Richtungen lesbar, und eine Kirrstelle zu wenig kostet eine Kirrstelle, eine zu viel bis zu 20.000 Euro.
Die gezählten Stellen stehen namentlich da, nicht nur als Zahl. An der Zahl hängt eine Rechtsaussage, und wer sie nicht nachzählen kann, kann sie nur glauben. Wichtig ist das dort, wo eine Markerart mitzählt, ohne in der Futterstellen-Liste darüber zu stehen: ein Maisfeld (Kirrung) ist eine Kirrstelle, taucht aber nicht als Futterstelle auf. Ohne die Namensliste wäre die Zahl in der Karte höher als das, was du direkt darüber siehst. - 🐕 Follow-up search: a record with the species, the dog handler, the result and any crossing of the boundary.
- 🎖 Wardening (Pro): the control rounds of the game wardens, that is, what was found where and when. Per round you enter the date, the type (a ground round, estate furniture, feeding and baiting, boundary and signage, other), the area and the finding; optionally with a reference to a marker, with a remark and with a photo. The list has a search and a CSV button like the other tabs.
Objected to or not, that is the real point. If you tick Beanstandung (objection), the entry stays open until somebody enters a date of completion. The tab itself then shows the number of open objections, and the filter Nur offene Beanstandungen hides everything else. Only the open ones are counted deliberately: a number that only ever grows says nothing after the third week. Open objections also turn up in the 📌 Today & upcoming overview.
A tick set by accident can be taken back afterwards. In the details of a control round you can change the date, the type, the area, the marker reference, the finding, the objection itself, the date of completion and the remark. Until early September 2026 only deleting and creating it again helped, and a record you can only correct by throwing it away is no record. Where the details say “Bezug (Marker)” (marker reference), you can also see whether the text in the area field was typed or taken from the marker name when the round was created.
Game wardens and the ground management may enter, everyone in the ground may look. Anyone who does not learn that there is an objection hanging on “their” high seat cannot deal with it either. So anyone who may not enter sees no form, but very much sees the list, including a line saying who enters here.
The tab is not always there. Anyone who holds the role Aufseher (game warden) sees it in every display mode: the control rounds are his job, and he should not have to switch the view first. For everyone else, the ground management included, it stands only in the full view (see “Display mode” above); there the ground management always sees it, and everyone else only once the first control round has been entered. If you have hidden the tab yourself in the settings, it stays hidden, even for a warden. It belongs to the Pro plan; on Basic it stands behind a lock. There is no secret behind that, only the same rule as everywhere in the navigation: only show what is needed. A tab that only appears where it is needed keeps the list short.
The game wardens also see the ground's history. Until August 2026 “📋 Was ist passiert” was reserved for the ground management alone; now the wardens get in as well, and a button in the tab leads straight there. Anyone who may put other people's entries right must also be able to look at what has changed. - 🌽 Damage & incidents: game damage, browsing damage, a wildlife-vehicle collision, found-dead game, a strike site and an extraction point, each as its own case with a history. The form leads you through in four steps, each with a number, a heading and a ? of its own: 1 Was ist passiert (what happened), 2 Wo (where), 3 Wann (when) and 4 Meldung (the report). Only two entries are really needed, both marked with a golden *: the type of incident and the day of the incident. Everything else you can add later, and the form says exactly that below itself.
The type of incident stands first and determines the fields after it. With game damage you get the area of damage (🌽 field, 🌲 forest or 🍇 special crop), the crop, the area affected, the species, the injured person or business, the parcel and the whole reporting part. With ⚠️ a collision and 💀 found-dead game exactly those fields disappear, and instead there are the road, place or kilometre mark, where the animal ended up (dead, fled, taken) and the body notified. If a whole block runs empty in the process, it goes with them: you only see what you actually need for this incident. The status moves from open through reported and settlement to done; on the jump to “reported” the reporting date sets itself. Tap a row to find 📧 Report with a prefilled e-mail, 📋 Text to copy and 🗺 Karte to jump to the spot in its details; if a marker is linked, the GPS coordinates stand automatically in the reporting template and in the printout. With these incidents the printout is called a “Wildunfall-Protokoll” (collision record) or “Fallwild-Protokoll” and has no signature line for the injured party: there is none, after all. A damage case needs no map point: it can come about without a marker too. Anyone in the ground may record it, including the team over the shared link without an account of their own: game damage is reported by whoever finds it. Above the list stand four filters: year, type of incident (that is, game damage, a collision, found-dead game and so on), status and area of damage. That last one was called “kind of damage” until early September 2026 and now carries the same name as the field in the form; it naturally only bites on game damage. Anyone who wants to see all the collisions of a year uses the type of incident.
The reporting deadline is worked out for your province. Above the form stands what applies there: the deadline, when it starts to run, who has to receive the report first, what form is required and the paragraph behind it, with a link to the text of the law. For every open game damage case the list also says by when the first report should be out. It is counted from the day you learned of it, not from the day of the damage; if that day is missing, the line says so and asks you to add it. In Tyrol and Vienna there is deliberately no date, but the legal sentence instead: the Tyrolean hunting act names no special first-report deadline, and in Vienna § 106 requires a notification before the commission is called upon, without naming a fixed number. An invented number would be worse than none. If your province is not set, no deadline appears at all, rather than the Lower Austrian one standing in for it. For collisions and found-dead game no deadline is ever calculated: those are not game damage compensation procedures. And all of it stays a checking aid, not legal advice.
German original, awaiting specialist review (reporting deadlines, PLAN-I18N-GERUEST §10)Zur Meldefrist: Die App rechnet ein Fristdatum nur für Niederösterreich (§ 107 NÖ JagdG: zwei Wochen, im Forst vier). In den übrigen Bundesländern steht bewusst kein gerechnetes Datum, sondern der Hinweis, im Landesjagdgesetz nachzusehen: die Durchführungsverordnungen der anderen Länder sind für uns noch nicht erhoben, und eine falsche Frist wäre schlimmer als keine. Für Wildunfälle und Fallwild rechnet die App gar keine Frist: § 107 gilt für Wildschäden, nicht für Verkehrsunfälle. Was dabei zu melden ist und an wen, richtet sich nach Straßenverkehrs- und Landesrecht. - 🖼 Photos: the photo collection of your ground across all the cases. A gallery for markers, damage, the bag, sessions, maintenance, follow-up searches and wardening: everything you have ever attached, at a glance, filterable, sortable, with a jump back to the entry. Three views you switch at the top right: grid (square tiles with the date and a type emoji), list (a thumbnail on the left, the title, the caption and the date on the right) and map (your ground with its outline, all the photos with a GPS position as points, overlapping ones bundled automatically). In the filter bar at the top you choose the target type (only damage photos, only marker photos and so on), the marker type (only high seats, only bait sites and so on), a date from and to, and you search for text in the caption field. The sorting at the top right offers newest first, chronological and most recently uploaded.
Tapping opens the detail: a large picture, the caption (editable), the capture and upload date, who uploaded it, the GPS position and a button Zum Eintrag → that takes you on the 2D map or in the matching planner tab to exactly where the photo belongs. On a phone: a long press on a tile opens the quick menu (view, jump, download, change caption, delete).
Selecting several at once works with Auswählen at the top right: tick the tiles, then 📦 ZIP for the download (the photos land in folders by target type, plus a CSV file with the date, the GPS position, the case, the caption and the uploader, ready for the authority's or the insurer's folder) or 🗑 Löschen.
Taking a new photo works with the big button 📷 Neu at the bottom right: three routes, depending on whether you are at your desk or standing in the ground. 📍 Neuer Foto-Marker jumps into the 2D map and starts the photo-first marker there (take the photo, choose the type, then tap 📍 Marker at my location and confirm with Save marker in the next window: the green button only arms itself once your position is in, the accuracy shows next to it). If you are standing close to existing markers, the map asks first: a list offers the nearest markers with their distance so you can attach the photo directly, while ➕ New marker creates a new point as usual. The same list also stands in the tool bar itself, once your position is in: each row names the marker and its distance in metres, one tap attaches the photo right there. 📋 An Vorgang anhängen attaches the picture to an existing damage case, a cull record entry or the like. And 📷 Frei auswählen takes the photo and files it without a target: you can assign it later in the detail, once you are back at your desk.
Looking at a photo and assigning it. A tap on a tile opens the picture, on a phone full screen. At the top it says which of how many you are looking at; swiping pages to the next and previous one (on a computer the arrows ‹ ›). Two fingers zoom into the picture, one finger then moves it, a double tap zooms in and back out. The details of the picture (the caption, the capture and upload date, who uploaded it, the position) lie at the bottom in a bar that you pull up and closed again by its handle. Behind the ⋯ at the top right stands 🔗 Anderem Marker zuordnen (assign to another marker): you pick from the list of your markers, and the picture then hangs there. That is exactly the route for everything you took with 📷 Frei auswählen while out and about. Plus download, change the caption and delete. Photos on bookkeeping receipts are deliberately excluded from the gallery: financial documents stay in their own home in the bookkeeping tab.
Photos stays visible in every display mode, compact included: compact shows Overview, Tasks, Statistics, Trail cameras, Trail-camera statistics, Photos and Settings (see “Display mode” above). - 📊 Statistics: the bag by species, hunting year, seat and shooter. At the top stands a year selector; the current hunting year is preset, and “all hunting years” remains available. On top of that come four analyses from the fields a cull record entry carries today: when you make your bag (by time of day, with the night hours highlighted separately), how (high seat session, stalking, driven hunt, follow-up search, trapping), the weight per species and class (mean and total) and the age structure per species. These four belong to the Pro plan and stand behind a lock on Basic; the totals and the breakdown by species, hunting year and seat stay open in every plan.
Every block names its denominator. If 36 out of 47 animals have no weight, it says exactly that and does not count those animals. No entry means “not recorded” and not “zero”: a mean that counts empty fields as zeros would simply be wrong. And as long as the server delivers nothing for a block, the box stays away entirely instead of standing there empty and looking like “nothing entered”. - ⚙ Settings: at the top the header card with the coat of arms, the name of the ground, “Deine Rolle in diesem Revier” (your role in this ground; what that means is under “Share your ground”) and the shared link; below that eight categories. On a phone you tap a category and come back to the list with ‹ Settings; on a computer, from 900 px width, all eight stand as a sidebar on the left, with the content beside it. 👤 Personal & device applies to you and this device: 🌐 Language, 📲 Install Revier3D and ⬇ Make available offline (both explained here). 🎨 Planner view: the display mode (the ground-wide compact/standard/full switch, switched at the top of the header, see above) and the Planer-Reiter (set every tab individually to full, note only or hidden). 🏰 Ground & hunting year: the name of the ground, the province, the year grouping and the stored details of the hunting rights holder (more on that right below). 👥 Access & team: the login mode, the member list and the card 🔗 View-only link for guests (more under “Share your ground”). 🗺 Map & 3D: the 3D preview, the surrounding area and rebuilding the ground boundary or loading it from a file. At the top of it stands the state: the line Reviergrenze says ✓ set (with the number of parcels if the boundary comes from the cadastre) or none yet · add it now, which jumps into the boundary editor of the 2D map. If a boundary added later reaches beyond the 3D extent that was built, that stands as its own line below, and 🗺️ Rebuild the 3D map rebuilds with a larger extent. 📍 Markers: which marker types exist, the symbol style, categories and your own icons. 📷 Trail cameras: e-mail forwarding and direct connections, explained further down. 🔒 Security & data: “📋 Was ist passiert” (the ground's history) and the Gefahrenzone (danger zone; deleting your account lives on the account page).
Which categories you see depends on your role: the ground management sees all eight, the game wardens four (Personal & device, Planner view, Map & 3D, and Security & data, there only the ground's history), an ordinary member three (Personal & device, Planner view, Map & 3D). Whatever your role may not do is, as everywhere in the app, not shown at all, not merely greyed out.
Who is responsible for the ground in hunting terms stands under “Revier & Jagdjahr”. The card Jagdausübungsberechtigter (the hunting rights holder) takes the name, the address, the administrative district, the legal form (a natural or a legal person), the capacity (owner of an own hunt, lessee of an association or municipal hunt, hunt administrator), an authorised representative with their place of residence, the competent authority and, voluntarily, the hunting district number. These details stand on everything that leaves the ground: on the province-specific hunting-ground permission papers as the issuer, and on the compliance record, the cull record and the annual report in the signature line. Without them an empty line remains there.
That is not the same as the invoice letterhead from the bookkeeping, and the difference is the whole reason for the card. The letterhead says who issues invoices; here stands who is responsible for the ground in hunting terms. Often the same person, but not always: with a hunting syndicate the letterhead is the syndicate and the person authorised to sign is a third party. Until August 2026 this card did not exist, and that could be seen on the official sheets: the signature line stayed empty, and the only name on it came from the bookkeeping, that is, from somebody who is not necessarily the hunting rights holder.
The capacity is not a convenience field. In Carinthia a hunting district with a hunt administrator may not issue a hunting permit at all (§ 41 Abs 4 K-JG 2000), and in Burgenland various reporting duties hang on it: the lessee of an association hunt reports every permit, the owner of an own hunt only those longer than a week (§ 66 Abs 4). The printout then says so too. The label follows the province: in Salzburg the card is called “Jagdinhaber”, in Vorarlberg “Jagdnutzungsberechtigter”, otherwise “Jagdausübungsberechtigter”. If you change the province, the label moves with it.
Explanations sit behind the small ? buttons. A category can be linked directly, for example /planer/#revier?bereich=kameras; older links of the form ?abschnitt=kameras keep working unchanged.
“📋 Was ist passiert” is the history of the whole ground, the newest line first: every record, change and deletion, filterable by the type of entry and by person. The ground management and the game wardens see it. Anyone working over the shared link without an account of their own appears there as “Revier-Zugang” (ground access): in Basic that is the normal case and not a data error. “Unknown” would be a claim, and an empty field would look like a fault.
Tap an entry: look, correct, export
A tap on a row in the bag, the high seat diary, the bookings, maintenance, follow-up searches, tasks or damage opens the detail view; in the feeding tab a tap on the feeding site opens the stock with all its entries. With the bag, sessions, bookings, maintenance and follow-up searches, “Eingetragen von” (entered by) stands there as well. For entries made over the shared link without an account of their own it says “über Revier-Link”.
- 📋 Log: in the detail view of the bag, sessions, bookings, maintenance, follow-up searches and damage there is a button 📋 Protokoll. It shows who created, changed, deleted or restored the entry and when, and with a change it shows the old and the new value (“Gewicht 18,5 → 21”). If somebody enters over the shared link without an account of their own, it says “über Revier-Link”: the line then says what and when, only not who. With real user accounts (Pro) the name stands there. The log survives even the final emptying of the recycle bin.
- ✏️ Edit: the bag, sessions, bookings, maintenance, follow-up searches, tasks and feeding entries you correct straight in the detail view: change the date, the values and the remark, save, done. A typo no longer means deleting and typing it in again.
- 🧾 Invoiced: in the detail view of a cull record entry it says whether this animal is on an invoice, with the invoice number and the amount. If it has been invoiced, the button next to it leads to that invoice instead of creating a second one: an animal charged twice is far more often a mistake than an intention. Only with that can you answer which animal went to whom for how much. (Invoices belong to the Pro planPro, see bookkeeping.)
- ⏬ Load older: the high seat diary, maintenance and follow-up searches show the most recent entries first; the button at the bottom fetches older ones. The search only searches what has been loaded: if “Ältere laden” is still at the bottom, further hits may lie in the older entries (the hit list points that out itself).
- 📄 CSV: the cull record, the high seat diary, the bookings, maintenance and follow-up searches each have a CSV button. The file opens directly in Excel or LibreOffice.
- 🖨 Compliance record: the fulfilment status of the cull plan (target, credited, of which found-dead game, open, fulfilled %) as a print view with a signature line; plus 📄 Fulfilment as a CSV, which additionally shows culls and found-dead game separately. Both buttons stand at the cull record. Under the table it says how the figure comes about: whether found-dead game is credited and how a plan row without a class counts. Whoever signs should be able to check the arithmetic.
German original, awaiting specialist review (official record sheets, PLAN-I18N-GERUEST §10)Die Unterschriftszeile heißt nach deinem Bundesland, und zwar auf allen diesen Blättern gleich: Druckansicht, PDF-Datei und Jahresbericht der Buchhaltung. Dort steht Jagdausübungsberechtigter, in Salzburg „Jagdinhaber", in Vorarlberg „Jagdnutzungsberechtigter", darunter der Name aus den Revier-Stammdaten. Vorher stand dort überall „Jagdleiter" beziehungsweise „Revierleitung", und das ist die engste Variante: einen Jagdleiter gibt es rechtlich nur, wo eine Jagdgesellschaft oder eine juristische Person Pächterin ist. Ein Eigenjagdbesitzer, der sein Revier selbst bejagt, hat keinen, und auf seinem Nachweis stand damit eine Funktion, die es in seinem Revier gar nicht gibt. - 📕 PDF file and 📕 Record as PDF: the same two sheets, but as a finished PDF file from the server instead of a print view in the browser. They carry the letterhead of your ground, that is, the name, address, contact, VAT number, logo and accent colour from the invoice settings, plus the signature line. The IBAN deliberately does not appear on them: these two sheets have nothing to do with payment. The file lands straight in your download folder, to file or to attach for the hunting association, and it looks the same for everybody. You do not have to attach it yourself any more, though: for that there are the two sending buttons below it (the next point). The figures come from the same source as the screen. Both buttons stand at the cull record and apply to the hunting year selected above.
The previous printing route stays unchanged next to it. 🖨 Print / PDF and 🖨 Cull plan return still open the print view in the browser, from which you print as usual or save as a PDF yourself. That is not a leftover: this route does not need the server, and if the finished file ever fails, you should not be left without a printout. What you set there does depend on your browser, though, and that is why there is the second route for everything that leaves the ground.
Like the printable map and the hunting permit, the two PDF files belong to the full version; during the 7-day trial the app says so and offers to unlock.Like the printable map and the hunting permit, the two PDF files stay locked during the 7-day trial; the app tells you so. - 📧 Send the record and 📧 Send the list: the same sheet goes straight as a PDF attachment to an address, without the detour over downloading and a mail programme. The two buttons stand under the PDF buttons at the cull record and apply to the hunting year selected above. You enter the address, get it written out once more in the confirmation and confirm: a typo is noticed exactly there or not at all, and a record sent to the wrong address means your ground's data in a stranger's hands. If the hunting association replies to the mail, the reply lands with you and not with us.
Afterwards it says next to the buttons when you sent which sheet to whom; the same note appears under ⚙ Settings in the history “📋 Was ist passiert”. That note is not decoration: a second compliance record looks to the hunting association like a correction that is not one, and someone who can see that they have already sent the sheet does not send it again out of uncertainty.
Only the ground management may send, and nothing is repeated automatically: if sending fails, the button says so, and you decide whether to try again or to download the PDF and attach it yourself.


Trail cameras: in every plan
The trail-camera connection and its analysis belong to the Basic scope and are therefore included in every plan, in Basic as in Pro. The only difference is the shared ground storage the pictures run into: 8 GB on Basic, 50 GB on Pro.
Place the marker
Place a Trail camera marker in 2D or 3D. It is complete immediately and may remain as a regular location without a connected camera.
Choose the camera
Open the marker and tap Choose camera or Connect camera. The same assistant is available under ⚙ Settings → Trail cameras.
Wait for the first image
The camera is already visible and linked. Until the first delivery arrives it says Waiting for the first image; images then appear at the marker.
- The filter row, one line even on a phone: right at the top stands one row with the three questions you ask every day while looking through: Cameras, Species and Time of day. One tap opens a list, one tap in the list selects, one tap beside it closes again. Each of the three shows for itself what is currently set, for example Cameras · 2 or 22:00 to 04:00. If there is nothing to tell apart, it is simply not there: the camera selection is missing on the 📊 Camera statistics page, because the camera comparison shows every camera separately there anyway, and Species only appears once your ground really has something to tell apart. At the right-hand end of the row sits a small arrow; behind it are the period (today, 7 days, 30 days, 3 months, everything or a date of your own), ↺ Reset filters, the explanation ? How do the filters work? and ⬇ Download table (CSV). A dot on the arrow shows that something is set there. The 1 2 3 4 buttons immediately above the images set the number of grid columns.
- 📷 Trail cameras and 📊 Camera statistics directly below it are two proper planner pages with the same filter row. On opening, after a reset and after a tap on the time of day, the period is always the last 30 days including today, and the line above the images says so as well (last 30 days · 212 images). You fetch older ones below the images: while the period still holds some, the button there reads ⏬ Ältere laden (load older), and once the period is exhausted the same place reads ⏬ Load another 30 days back and shifts the window back by a month. To go further back, set a longer period or a date of your own behind the small arrow. In Time of day there are four shortcuts that calculate times for each capture date at the ground location: 🌅 Morning runs from 2 hours before to 3 hours after sunrise, 🌆 Evening from 3 hours before to 2 hours after sunset, ☀️ Day from sunrise to sunset and 🌙 Night from sunset to sunrise. These are wildlife activity and daylight windows, not legal shooting times. In the same list you can instead set a fixed window under Custom time of day, across midnight as well (22:00 to 04:00 shows the night hours); a shortcut and a fixed time are never active together. Period and time of day are two different questions and combine: which days, and which hours on each of those days. Species takes the camera’s own grouping if your ground has camera detection, otherwise the species entered by hand; it acts on both pages. Under 📷 Trail cameras you immediately see the photo grid; the camera selection and 📎 Own photos (photos you uploaded yourself on your entries, off by default) sit there in the Cameras list. The separate 📊 Camera statistics page shows activity by time of day, a tappable weekday-by-hour heatmap, the comparison with the immediately preceding period of equal length, the three most active cameras with a 7-day trend, twilight and the moon phase normalised by nights; with an ICU connection it also shows camera detection. The camera comparison counts images per active day, so unequal running times do not distort the picture. Individual tables can be exported as CSV; 📄 Complete analysis as PDF combines the visible filters and every analysis block in a searchable report. Automatic detections are clearly marked as such, rather than as a confirmed species or an official record. No camera selection is needed in the statistics: the comparison shows every camera separately. In the photo grid you name the species right in the tile; with an ICU connection the 🤖 detections sit on the images as suggestions, and the selection list uses ICU's own categories (switchable to our species under ⚙ settings → trail cameras). Deleting goes into the recycle bin. Setup methods are shared between ⚙ settings and the trail-camera marker:
- By email: First name the camera in the assistant and immediately receive an individual address for that camera. Enter it in the camera or manufacturer account as the recipient or forwarding address. This works with any camera that can send images by email and identifies it independently of the subject line.
- Through ICU: Enter the email address of your ICU account. ICU sends a code to that account's inbox, which you confirm. Revier3D stores no ICU password. Detected cameras can be selected before their first new image arrives; importing image history may take a few minutes.
- Direct connection: ICU is currently enabled for this. Each other manufacturer tile says whether the email route is available, a review is still running or the manufacturer prohibits a direct connection. Credentials are stored encrypted and are not displayed again. More than one account from the same manufacturer is supported. Under Manufacturer connections you can sign in again, fetch now or disconnect; existing images remain available after disconnecting.
Only ground management can delete a camera. Under Manage camera, Delete camera moves it into the recycle bin after a confirmation. Its images go with it and return together through Undo or a later restore. Important: if a new image then arrives through its receiving address or manufacturer account, the camera and its images reappear. To prevent that, disconnect the connection first and only then delete the camera.
With the Pro planWith Pro
Pro can be booked and costs €39.90 a month or €399 a year. The 7-day trial runs with the Basic scope. You can unlock at any time afterwards. These parts are included in the Pro plan: These parts belong to Pro:
- 🎖 Wardening: the control rounds of the game wardens with the area, the finding, a photo and an objection that stays open until somebody enters a date when it was dealt with. The tab is described above in the planner chapter.
- 🥩 Game meat: animals from the customer's own hunting ground, with the trained person's examination, province-specific identification, handovers and trichinella samples including a report attachment; from these, the app provides registers, a ground-only annual report and non-official form-filling aids.
- 📅 Bookings: who sits when on which seat, with a notice about a double booking and the 90 day look back.
- 📊 Statistics in depth: the four analyses when, how, weight and age structure. The bag by species, hunting year, seat and shooter stays open in every plan.
- 💰 What an animal costs us: a card at the bottom of the tab 📊 Statistik, visible only to the ground management. It is the only place where the bookkeeping and the bag of the same hunting year come together: the cost per animal culled, feed costs per animal, game meat proceeds per kilo, proceeds per guest hunter, the lease per hectare and per animal, plus the contribution margin per species. Under every figure it says what it is calculated from: “€18.40 per animal” out of two animals is something different from the same figure out of 47, and only the second is any use in a lease negotiation. Where there is no denominator at all, it says “keine Angabe” (no figure) instead of a zero. The calculation runs by hunting year, while the journal is assessed by calendar year: the tax office asks about the calendar year, the lessee about the season.
- 💰 Bookkeeping: the ground's cash book with receipt photos, built for the Austrian record-keeping duties. The first time you open it, the tab asks two questions: who does your tax (an accountant or you yourself) and, if yourself, whether you are a small business. In accountant mode you record gross amounts only, and your accountant posts the VAT from the receipt. The tab is visible only to the ground management: financial data is no business of guest hunters.
- 📷 Photograph a receipt: the big button opens the picture selection, and the form then fills itself. The text recognition reads the amount, the date, the receipt number and the merchant on the device itself (the picture does not leave your phone for that) and proposes them as tappable chips: nothing is taken over unchecked. Speichern, nächster Beleg works through a whole stack. Receipts are stored at high resolution so that the small print stays readable: the photo replaces the paper file. § 132 BAO allows that; only signed deeds still belong in the original archive.
- 📄 PDF receipts: an incoming invoice that is sitting in your mail as a PDF you upload directly, without photographing it. The picture selection takes PDF files too; they appear as a 📄 tile, and a tap opens the file. PDF receipts go into the complete export and to the accountant just like photos.
- 🏦 Import a bank statement: upload the CSV or Excel file from your online banking, map the columns (the tab proposes the mapping), check, take it over. Every row becomes a draft that you edit and commit as usual. Rows already imported or duplicated are recognised by the import from a fingerprint of the date, the amount and the payee; they are only taken over if you tick them explicitly. Nothing lands twice in the journal.
- 🗂 Receipt gallery: all the receipt pictures and PDFs at a glance. The search also reads the receipt text recognised on the device and searches across all the years: “Lagerhaus” finds the till slip even if you no longer know the year. A tap on the picture shows the receipt, a tap on the text line opens the matching posting.
- 📅 The hunting lease: deposit the annual amount, the due date and the lessor once (during the initial setup or in the settings), and then the overview shows a lease card with the due date every year. A tap on ✍️ Jetzt verbuchen creates the fully prefilled expense as a draft; once the lease is posted, the card shows the green tick. When the next year comes round, the card reminds you again by itself.
- ✅ Committing: new entries are drafts and freely changeable, and deleting goes into the recycle bin. Committing assigns the next consecutive receipt number; after that the posting is unchangeable, as the Federal Fiscal Code requires. Corrections then run as a reversal with a reason: a counter-posting with its own number comes about, both stay visible, and the totals add up again. Every record and every change stands in the change log, callable via 📋 Protokoll in the entry.
- 📄 Exports: the journal as a CSV (it opens in Excel and suits the import assistant of any accountancy software), optionally for the quarter. Plus BMD, RZL and DATEV as beta formats: the account assignment is deliberately left empty in them, and your accountant assigns it on import; before the first productive import please have your accountant check it once. The 🗂 Komplett-Export packs the journal, the change log and all the receipt pictures at full resolution into a ZIP named by receipt numbers: with that you meet the 7 year retention duty entirely without Revier3D. This export stays available to you even after a Pro plan endsonce your ground is no longer on Pro. For your own analysis, 📊 Excel delivers the journal as a real workbook with a totals sheet (year, categories, months), and 🖨 Jahresbericht prints an annual overview with a signature line, for the annual general meeting for instance.
- 🔗 Accountant link: in the bookkeeping settings you create a read-only access for your accountancy firm. They see the journal and the receipt pictures and download all the exports themselves, by quarter or for the whole year, without an account of their own and without mail going back and forth. Every access is noted in the change log. Give the link only to the firm directly; Link austauschen or Widerrufen makes the old one invalid at once.
- 🖨 Own receipt: for expenses without an original receipt, every entry prints an own receipt with all the compulsory details and a signature line. You enter the name and address for it once in the settings.
- 🧾 Create an invoice: with your own letterhead (logo, address, IBAN, accent colour, all in the settings). An invoice has line items, because nobody buys only a trophy: the cull fee, the trophy, game meat per kilo and the guided stalk stand on one sheet, with a ready quick selection; from a cull record entry you take the cull over directly as an item. Two routes: out of an income entry (the money is already there, the buyer gets their receipt, and with a cash sale that is even compulsory) or on its own for the guest hunter: the invoice then stands as “open”, and only your tap on “Als bezahlt markieren” puts the income into the journal as a draft, neatly linked, nothing twice. Issuing assigns a consecutive invoice number of its own; small business invoices carry the exemption note, and with VAT it is shown per rate.
- Thinking along, not deciding: the tab warns if your cash income approaches the cash register threshold, or your income the small business threshold of €55,000 gross. And honestly, what the bookkeeping is not: no balance sheet, no VAT return, no cash register, no tax advice. It is the preparatory bookkeeping: record cleanly, check, hand over. Corporations such as a forestry company with its own hunt must keep double-entry books; the accountant link and the accountancy exports are meant for exactly them, and the real books are kept by the firm.
On top of that come two abilities that are not tied to a tab: real user accounts with roles and graded permissions, and separate guest hunter accesses with camera permissions per guest (see “Share your ground” further below).
Sharing the ground with your fellow hunters
Every hunting ground has an address of its own, for example revier3d.at/r/dein-revier. That is how your fellow hunters get in, entirely without an account of their own.
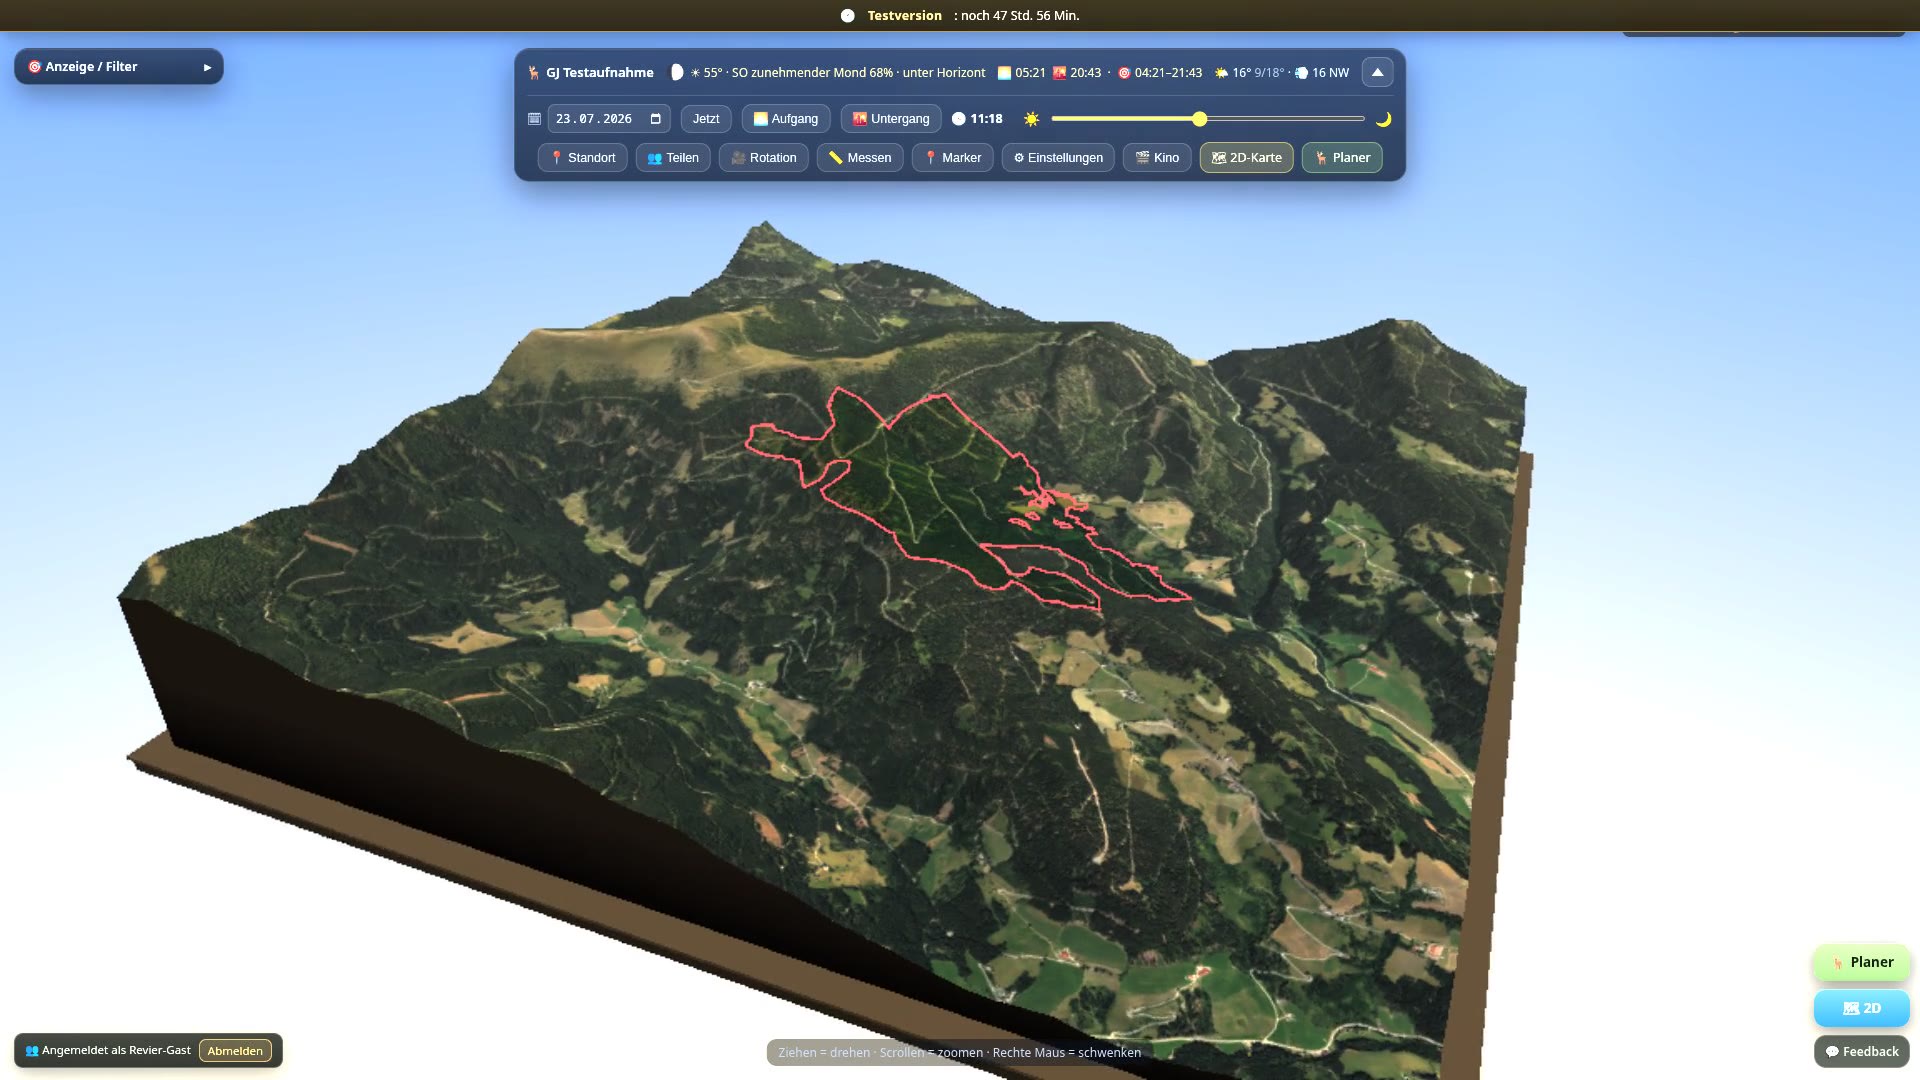 0:15
Sharing the ground
0:15
Sharing the ground
Set a password
In your account you find the card Revier-Link teilen. There you set a ground password.
Send the link
Send the link and the password to your fellow hunters. The two together are enough, nobody needs more.
Work together
Everyone sees the same ground and may enter things: markers, the bag, the diary, tasks.
Two things that go with it. The link is shown only once; if you need it again later you simply create a new one. And it carries the read key of your ground inside it, so that your guest can open the encrypted data at all: that is why your ground has to be unlocked when you create it, and why whoever holds the link can see everything until it expires. Give it only to people you want to show your ground to, just as you give the ground password only to your team.
Zero-knowledge: what the server sees of your ground
Your ground data is encrypted on your device before it reaches us: markers and their positions, notes, photos, the cull record, the ground boundary and the bookkeeping. All the server holds is the encrypted state. We cannot read it, cannot decrypt it and cannot hand it over, not even on a court order. This applies in both plans, in Basic as in Pro, and from the first minute: you choose the ground password right in the setup assistant, and it is the key at the same time.
The encryption is not complete, and we say where. Permanently the server knows how many entries your ground has and when they were created, plus your account email, the plan, the ground link, the members with their roles and the storage used. Also unencrypted are the name of your ground, the country and the region (shooting seasons and deadlines follow from it) and the names of your trail cameras: anyone who uses a field name here is giving away a hint about the place. And it knows where your 3D model was built: the square of map around your boundary sits with us, the pictures in it encrypted, but their folder names are map-sheet numbers and therefore readable. That names the area, not your boundary, not your markers and not you.
Briefly it sees more, and only while it lasts: when the boundary is edited, when the 3D map is built and when a document is produced, the server does the computing for you; none of it is stored. For the twilight analysis of the trail cameras your device sends a coordinate along, rounded to a cell of about one kilometre; the weather itself your device fetches straight from the weather service, past us. That rounding is not a hiding place, since the server knows the model's location more precisely anyway; it only makes sure nothing more precise than necessary goes down the wire. Every named exception is listed one by one, with its reason, on the security page, the technical detail is in the whitepaper.
The same limit applies to chat. In plain text the server only sees process data there: which ground, the order and time of each entry, the account number of the sender, the type of entry (message, automatic activity or report to the ground management), for a report the chosen reason, and the source reference as an identifier. Message text, the names of link users, captions and attached photos stay encrypted there too.
Without the ground password and without the recovery code nobody can get at the data any more, not even us. Keep the recovery code separately from the password.

Personal accesses instead of a shared password
In the planner under ⚙ Settings → 👥 Access & team stands the login mode. Single user is preset: one shared ground password for everybody, as described above. With the Pro planWith Pro there is multi user: every member signs in with their own user name and their own password, with a role and permissions.
- What happens when you switch: from the moment you switch over, the shared link refuses every new sign-in. Anyone already signed in over the link is not thrown out, though: they can go on entering for 30 days and can look at everything afterwards. A strip at the top of the planner gives the exact date. That date hangs on the ground and not on the individual session, so all the link guests have the same one and the shoot captain can announce it. A ground may therefore switch over in the middle of the season without taking entering away from its hunters that same evening.
- A membership can be limited in time. At every member 🎫 Zugang, Jagdkarte, Kontakt unfolds: app access dates, hunting-licence details, the cull scope, a telephone number and a note. App access is not automatically the legal permission to hunt. Its dates are only carried over as a filling suggestion and must be confirmed or changed before signing.
- Expired means: looking yes, changing no. After the end date the member still sees everything but can no longer enter anything until the ground management extends it. The same line applies to an access that only starts later. For shoot captains and admins the end date has no effect: otherwise the administration could lock itself out and would not reach any button to put it right.
- Leaving and excluding: A member with an account of their own can leave the ground in the planner (Leave this ground under Settings, Personal & device); the management can take them back at any time. Only the ground management can exclude someone, in the member list with ✕. Whoever comes in via the ground link has no account and has nothing to leave.
- You see it before it is too late: in the member list there is a note at every name (“Zugang bis 30.09.2026”, from 14 days beforehand “nur noch bis”, and afterwards “abgelaufen”), the same for the hunting licence, plus “Zuletzt gesehen” (last seen). And in the tab ✅ Tasks a hint line appears as soon as accesses or hunting licences expire within the next 14 days or have expired already.
- 🎫 The printable hunting-ground permission papers use a title and legal mode specific to the Austrian province. Because the legal basis remains in German until specialist review, the details below stay in the German original.
German original, awaiting specialist review (official forms, PLAN-I18N-GERUEST §10)🎫 Reviererlaubnis-Unterlagen zum Ausdrucken entstehen aus diesen Daten, aber der sichtbare Titel und die Wirkung folgen dem Bundesland. Das Blatt trägt nur Revier, Person, Jagdkartennummer und -gültigkeit, den zu bestätigenden Erlaubniszeitraum, den Abschussumfang, Aussteller, Ausstellungsdatum und Unterschriftszeile. Produktrolle, Telefonnummer, Aufsichtsbestellung und QR zum privaten Revier-Link gehören rechtlich nicht darauf und werden nicht mehr ausgegeben. In Tirol kommt das vorgeschriebene Ja/Nein zur Hegeabschussbefugnis als handschriftlich auszufüllende Auswahl dazu. Den Einzel- und Sammeldruck findest du unter 🎫 Reviererlaubnis-Unterlagen. Jede Person bekommt eine eigene Seite; nur die Revierleitung darf diese personenbezogenen Unterlagen erzeugen.
Der Abschussumfang ist keine Zugabe: welches Wild dieses Mitglied erlegen darf, ist in Salzburg, Tirol und Vorarlberg eine Pflichtangabe auf dem Schein (§ 47 Abs 1 S-JagdG, § 12 Abs 3 TJG, § 23 Abs 3 Vbg JagdG). Das Feld ist mit Absicht freier Text: Tirol erlaubt ausdrücklich die Beschränkung auf einzelne Wildstücke, und „der zweite Rehbock, danach nur Raubwild" ließe sich in keiner Ankreuzliste abbilden. Bleibt es leer, steht auf dem Blatt „nicht hinterlegt" statt gar nichts: eine fehlende Pflichtangabe soll man sehen.
Wer ausstellt und wer unterschreibt, steht jetzt auch drauf. Beides kommt aus den Stammdaten des Jagdausübungsberechtigten (siehe Planer, ⚙ Einstellungen); die Unterschriftszeile trägt dessen Bezeichnung nach deinem Bundesland und darunter den Namen. Bis dahin war dort nur eine leere Linie. Ist im Revier eine juristische Person oder eine Jagdgesellschaft eingetragen, steht auf dem Blatt zusätzlich der benannte Mensch dahinter: unterschreiben kann eine Gesellschaft nicht. Im Burgenland nennt der Vorbehaltskasten die Meldepflicht, die für Eigenjagdbesitzer und Pächter verschieden ausfällt. In Kärnten wird der Download bei einem Jagdverwalter ganz gesperrt, weil § 41 Abs 4 K-JG 2000 dort die Ausgabe verbietet.
Warum nicht überall derselbe Name: In NÖ geht es für die gewöhnliche Reviererlaubnis um eine Zustimmung und einen freiwilligen schriftlichen Nachweis. Die Steiermark verlangt für unbegleitete Jagdgäste eine schriftliche Bewilligung. Tirol und Wien kennen den frei gestaltbaren Jagderlaubnisschein. „Begehungsschein" steht in keinem der neun Landesjagdgesetze und bleibt nur ein Suchwort aus der Jägersprache. - German original, awaiting specialist review (official forms, PLAN-I18N-GERUEST §10)Fünf Länder haben einen Pflichtvordruck: In Salzburg, Oberösterreich, dem Burgenland, Kärnten und Vorarlberg heißt das App-PDF deshalb unübersehbar „Ausfüllhilfe zum amtlichen Jagderlaubnisschein". Es ersetzt das nummerierte oder formatgebundene Original und dessen Unterschriften nicht. Im Burgenland nennt es zusätzlich Abschusslisten- und Meldepflichten, in Kärnten wird bei einem Jagdverwalter die Ausgabe mit Fehler 409 ganz gesperrt, und in Vorarlberg erinnert es an das gesetzliche Erlaubnisverzeichnis. Jagdkarte oder Jagdgastkarte und Reviererlaubnis bleiben getrennte Nachweise: nur Salzburg und Tirol lassen die jeweilige Jagdgastkarte die konkrete Reviererlaubnis einschließen; OÖ, NÖ, Burgenland, Kärnten, Steiermark, Vorarlberg und Wien nicht generell.
Live position
Whoever shares their position is visible to the others in the 2D map and in the 3D diorama. You switch the sharing on and off yourself. Handy during a driven hunt and when briefing guests.
Position stays off on the phone? If you opened the link from inside Instagram, Facebook, WhatsApp or LinkedIn, the page is running in that app’s in-app browser. Those browsers often swallow the location prompt silently: the prompt does not even appear, and the live position, the SOS position and the track recording simply hang. The way out is named differently on each device. On Android, open the ⋯ menu at the top right and choose “Open in browser”; the page then runs in Chrome. On the iPhone, press and hold the address bar or the link and choose “Open in Safari”. Revier3D tells you so by itself: in the map, in the 3D diorama, in the planner and in the setup assistant a hint bar then stands at the top with exactly that route, matched to your device. It does not appear on the start page, because none of those three functions live there. If the change does not help on the iPhone, check iOS Settings, Privacy & Security, Location Services, Safari (set it to “Ask”). If the prompt does come and you decline it by accident, you can allow it again after the next button press. In the Revier3D app from the store the problem does not exist, which is why the bar never appears there.
Position stays off on the phone? In the Revier3D app the page asks your device for the position directly, there is no other browser in between. If no prompt appears at all, look in your device settings under privacy and location services to see whether Revier3D may use the position. If the prompt does come and you decline it by accident, you can allow it again after the next button press.


Chat: talking with the whole team
A floating 💬 Chat button goes with you in the 2D map, in the 3D diorama and in the planner, with an unread counter that updates itself. On the phone it opens the chat full screen, on the computer as a side panel next to the map.
- Messages go out to everyone in the ground, up to 4,000 characters long, optionally with a photo attached.
- Grey lines appear in between on their own: new markers, paths and areas, entries in the bag record, photos, maintenance, bookings, feeding, notes and new trail camera images, one line per camera and delivery. Tapping one jumps to the entry in the 2D map. When many camera photos come in quickly one after another, the chat pulls them together into ONE line, for example “📷 57 new photos · Wildkamera Gamsegg · 17:02 to 19:36”; tapping it opens the single lines again, tapping it once more closes them. A new day, a post that comes in between and a pause of more than six hours each keep the lines apart. In an encrypted ground the camera name is not in plain text on the server, so the line there counts arrivals instead of photos.
- Who reads and writes: the shoot captain, the game warden and hunters, plus whoever comes in over the shared link, exactly the roles from further up. The guest role does not see the chat at all.
- The ⚙ at the top of the chat is open to every role. Right at the top of it sits the section Hidden with the people you have hidden; you see that as a shoot captain just as much as a hunter or a guest over the ground link. Below it the ground management sets things up: switching the whole chat off, hiding single activity categories, or taking the writing away from everyone who comes in over the shared ground link with the setting Link users may write in the chat. They still read along and still make entries in the ground, they just no longer write in the chat. Hidden means hidden, nothing gets deleted by it. Anyone who is not the management never gets to see those switches at all.
- 🚩 Report post: Hold down someone else's message, tap 🚩 Report post, choose a reason and add a sentence if you like. The report goes encrypted only to the management and supervisors: it appears there as a 🚩 entry in the chat, with the reason and a button Go to the post. If the management holds down that 🚩 entry, it offers ✓ Done, delete report and 👥 Remove member; done means that the report itself disappears. Revier3D only learns by e-mail that a report was made in your ground, about which entry and with which reason, never the content. The same path exists in the ⋯ of every marker card and in the photo gallery.
- 🚫 Hide person: If you do not want to see anything from someone at all, hold down one of their posts and tap 🚫 Hide person. The question beforehand says exactly what will happen: “Posts and photos from Max are hidden for you. That person is not told about it. You can undo it at any time in the chat settings.” Afterwards a short note confirms “Posts from Max are being hidden”. Their messages and their photos disappear for you, in the chat as well as in the photo gallery; everyone else still sees them, and they themselves notice nothing of it. The hiding belongs to your account and therefore applies on every one of your devices. You can show the person again at any time, and you need no particular role for that: the ⚙ at the top of the chat is open to everybody, and right at the top of it the section Hidden lists every name, with Show person again next to each one. There is one exception: a 🚩 report from a hidden person still reaches the ground management. For anyone taking part over the ground link without an account of their own, the hidden persons stay on that one device.
- 👥 Remove member, in every plan: The ground management can take somebody out of the ground, in the Basic plan too: 👥 Remove member in the menu of the report, or in Planner → ⚙ Settings → 👥 Access & team. The question reads “Remove Max from the ground? Access ends immediately.”, and that is meant literally: access ends immediately. If there is no account behind the reported post at all but somebody over the shared ground link, the notice says so and points at the switch that actually bites, namely the writing permission for link users in the ⚙. Only inviting new members stays reserved for the Pro plan: showing somebody the door has to work in every plan, letting somebody in does not.
If something cannot be settled inside the ground: report to [email protected], we usually reply within 24 hours.
In encrypted grounds the chat is end-to-end encrypted too: the message text, the names of link users, captions and photos are read only by your own device. What stays visible to the server is explained under "Zero-knowledge" further up.
Without a signal, text messages wait in the queue and go out by themselves once you have reception again, just like other entries ("📴 No signal" further up).
Account, plan and trial
In your account you manage your hunting ground, your password and your plan. You reach it through 👤 Account: on a phone in the last field of the bar at the bottom, on a computer in the header or tool bar.
See the Revier3D factsheet for plans, devices and data sources.
- Trial: after registering you have 7 days of access to the complete Basic scope, with no payment details. Reserved for the full version areLocked during the trial are only the finished PDF files from the server: the printable map, the cull record, the compliance record and the hunting permit, plus sending them by e-mail. The print view in the browser is open to you everywhere.
- Basic costs €9.90 a month or €99 a year. In the price popup you see the current selection.
- Beta founder price: €9.90 a month or €99 a year. Applies to bookings made up to and including 31 December 2026. The price stays in place for as long as the subscription runs without interruption. Regular Basic price from 1 January 2027: €19.90 a month or €199 a year.
- 🎟 Promotional code: if you have been given a code, you redeem it right when you create the ground in the assistant, or later in your account under 🏔 Aktuelles Revier. It extends your free trial and can run it with the Pro scope; how long and with which scope is shown in the status line straight away. When the time is up, the usual applies again: your ground and all your data are kept, and the controls are blocked until you unlock. A ground accepts exactly one code, a second one is refused.
- After the trial your ground is kept and stays visible: the 3D diorama keeps turning as a shop window, and the controls are blocked until you unlock. Nothing is lost.
- Managing the plan: payment details, invoices and cancellation run through the subscription portal, which you open in your account. After cancelling, the installed app and its data remain yours, including trail-camera pictures already imported. Only server sync, sharing via the ground link, live weather and the LTE trail-camera feed end with the subscription.
- 🔒 Encryption: your ground data is encrypted on your device before it reaches the server. Only you hold the key, not even we can read your data. Details are on the security page and in the whitepaper.
- A guest in somebody else's ground: if you are signed in with your account in another ground over a shared link (revier3d.at/r/…), you see a note at the top saying “Du bist als Gast in diesem Revier” (you are a guest in this ground). One click on ← Back to my hunting ground takes you straight back.
- Forgotten your password: request it on the sign-in page, and you get a link by e-mail.
- Sign in with Google: on the sign-in and the registration page there are the buttons Sign in with Google and Register with Google. If you already have an account with the same e-mail address, it is linked automatically at the first Google sign-in: you get an information e-mail and can use both routes from then on. Anyone who registers with Google has no password with us. The password card in the account is then called 🔑 Set password and sends you a link by e-mail; you only need a password for the danger zone, for deleting a ground or an account for instance. In the Instagram or Facebook browser the Google button is missing, because Google does not allow the sign-in there: open revier3d.at in Safari or Chrome, and with an e-mail address and a password it works there too.
- 🌐 Language: the app speaks German and English. Every member sets their own display language in the planner under ⚙ Settings, card 🌐 Language. The choice is yours alone, not for the whole ground, and it reloads the page once. On the start page you can also switch the language in the footer, and the English edition sits at revier3d.at/en. For Austrian grounds the server still produces official PDFs (printable map, cull record, compliance record) in German. The display is English, the sheet for the authority is German.
- 📦 Data export (GDPR): in your account you download everything from your ground as a ZIP: the bag, sessions, maintenance, follow-up searches, bookings, damage, the cull plan and the change log as CSV files (they open directly in Excel), plus the markers, paths, areas and the boundary as GeoJSON. The current game-meat record is included in full as wildbret.json: trained-person profiles, carcasses, examinations, trichinella samples and handovers remain correctly linked by their identifiers. Existing entries from the old handover workflow are also included in wildabgaben.csv. The photos are not included: they can be several hundred MB in size and stay in the app on their entry.
- Several hunting grounds: Under 🏔 My hunting grounds you switch between every ground in your account and see whether each one is ready offline on this device. + Add hunting ground adds another ground to the same account. Prepare each ground separately for offline use; the demo remains read-only while offline.
- Deleting a ground: 🗑 Delete hunting ground stands in your account in the danger zone: it is final, and for safety your password is asked for. If it was your last ground, you land straight back in the setup assistant afterwards and can create a new one at once.

Hunting grounds in Germany
Germany is switched on in the setup assistant: you can create a ground there just as in Austria, with aerial imagery, 3D terrain and ground management, but without the hunting-law module. This section says what a German ground gets and what it does not. The overview of all countries is on the countries page.
Two small things that follow from this: the hunting year of a German ground starts on 1 April (you can change that in the planner under ⚙ Einstellungen → 🏰 Revier & Jagdjahr), and the emergency numbers are the European emergency number 112 and the police on 110.
Aerial imagery, 3D terrain and map
- The aerial image comes from the state survey authority, not from a satellite provider: from the official digital orthophoto of the respective state. Coverage and acquisition dates vary by location. Ground creation is prepared for the thirteen territorial states and Berlin; Hamburg and Bremen remain excluded.
- Ground creation is prepared for 14 of the 16 federal states. It uses the official terrain data of the respective state. The assistant checks data at the selected location; if data is missing or cannot be read, creation stops with a message. Hamburg and Bremen cannot be selected yet. A country release does not promise that every dataset is complete everywhere.
- The topographic map is called TopPlusOpen and comes from the Federal Agency for Cartography and Geodesy. The 🗺 Topo switch in the 2D map shows it instead of the Austrian base map. It goes up to zoom level 18; zoom in further and the last map image stays and is simply drawn larger. The source credit sits in the corner of the map for as long as the layer is on.
- Buildings, paths and watercourses come from OpenStreetMap, as they do everywhere. The 3D building layer is therefore as complete as OpenStreetMap is in your area.
Parcels, boundary and cadastre
- Taking parcels over requires an enabled regional data source. The route is the same as in Austria: you trace around your ground or tap its corners, and the app fetches the official parcels from the state ALKIS cadastre and makes your boundary from them (see “Setting the ground boundary”).
- Revier3D does not currently offer parcel import in Bavaria. The app lists the alternatives: draw the boundary on the map, tap its corners, or import a finished file (KML, GPX, GeoJSON, Shapefile). Aerial imagery, elevation, terrain and buildings work perfectly normally in Bavaria, only the parcel takeover is missing.
- The cadastre layer 🔢 in the 2D map exists in North Rhine-Westphalia and Brandenburg: thin black parcel lines over the aerial image. Where a state authority offers no pure line layer but only the full cadastral map, the switch stays away rather than covering up your aerial image.
- The parcel identifier looks different from the Austrian one. Instead of cadastral municipality and parcel number there is the Gemarkung plus the Flur with numerator and denominator. Saxony and Hamburg keep no Flur at all, state-wide; that field then stays empty, and that is not an error.
Forest, tree species and watercourse width
- The forest stands at its real height wherever the state openly offers a surface model from the laser scan: in North Rhine-Westphalia, Mecklenburg-Western Pomerania and Brandenburg. The canopy height is computed from it, not estimated. In the other states the diorama is built without that extra: the terrain is right, the canopy is missing.
- Broadleaf, conifer and mixed forest show in the tone of the canopy, and streams lie in the map at their official width. Both come from the official landscape model (ATKIS Basis-DLM) via basemap.de. The features themselves, paths and watercourses, still come from OpenStreetMap; from the landscape model the app takes only the attribute.
Place names and surroundings
- Hills, forests, landscapes, waters and settlements appear as name signs in the terrain. They come from two official sources: the landscape model of the respective state and the nationwide GN250 name register of the Federal Agency for Cartography and Geodesy. The federal register adds the hills with their elevation and the forest names that the state register does not carry.
- Wayside shrines, wayside crosses, chapels and monuments come from OpenStreetMap and from Wikidata. They appear as a symbol in the terrain and can be tapped like a marker.
- The density of names is thinner than in Austria, and that is the data situation, not a fault: an Austrian ground quickly carries several hundred field names, a German one considerably fewer. Wikipedia extracts are not available in German grounds yet; the info card then shows the name and the type, but no text with it.
- The layer for other people's hunting cabins exists only in Austria. There it comes from the official register of the Federal Office of Metrology and Surveying; there is no equivalent official register in Germany.
Forest rescue points
Germany has a nationwide network of forest rescue points: fixed, signposted places on forest tracks that the ambulance service and the fire brigade can drive to. In an emergency you give the control room the number of the point, and it then knows the place and will find you even if you cannot describe the way. The register is kept by the Kuratorium für Waldarbeit und Forsttechnik; the points are reported by forest administrations, forest owner associations and woodland owners.
- Where they sit. In the 2D map they are a layer of their own, ⛑ Rettungspunkte, and in the 3D diorama a symbol of their own in the terrain. A tap shows the number, the description of the location and the coordinate. You switch them on and off in the display menu; the setting applies to this device and to 2D and 3D together.
- They sit on your device, not with an outside service. The points come with your ground package and are therefore there in a dead spot too, which is exactly when you need them. The provider of the points never learns where your ground is.
- Nothing about them is smoothed. Number and position appear exactly as the source keeps them: no rewritten labels, no rounded coordinates, and points close together are not merged into one. The licence requires that, and here it is also the right thing to do.
- A rescue point replaces neither an emergency call nor local knowledge. The register is not complete. The number to dial is 112.
Official specialist maps in Germany
The third tab ▧ Fachkarten (explained above in general) exists for German grounds as well, and with content of its own: the Austrian maps do not fit there because they depict Austrian planning law. Included are nature reserves and landscape protection areas, Natura 2000, national parks, nature parks and biosphere reserves, plus water protection and mineral spring protection areas, flood areas, the forest-ecological growth regions and growth districts, and approved state datasets on forest functions.
- What is missing is stated in the tab itself. The categories, protection zones and forest functions shown depend on the federal state and the prepared regional dataset. A national overview does not automatically include local zones or all state data. The tab names the source, data date and known gaps; it does not establish completeness.
- The data date differs per category, and it is stated with every area: the Fauna-Flora-Habitat and bird protection areas are from 2019. Read it before you rely on it.
- Here too: this is planning information, not legal advice. The regulation, the decision and the official original source remain binding. Where nothing is coloured in, that does not mean “nothing”, only that these maps have nothing recorded there.
Weather
In a German ground the weather and the forecast come from the Deutscher Wetterdienst, the German meteorological service. Seven days including precipitation probability are fetched, plus an hourly run that starts at the current hour. As everywhere, your device asks the weather service itself, not our server, and it transmits only the location of your ground rounded to about one kilometre. You can switch that off per device in the 3D view under Wetter & Himmel with Kein Wetter abrufen.
Where the data comes from
These source credits apply to a German ground. They are also stated in the legal notice, and with the individual object in the map the source it came from is always named.
- Aerial imagery and laser scan terrain: geodata of the state survey authorities, named individually per state: © Geobasis NRW (dl-de/zero-2-0), © Bayerische Vermessungsverwaltung, © LGLN Niedersachsen, © LAiV Mecklenburg-Vorpommern (CC BY 4.0 each), © LGB Brandenburg (dl-de/by-2-0), plus the remaining state authorities for the aerial imagery.
- Topographic map: Kartendarstellung © BKG (2026) dl-de/by-2-0, Datenquellen: sgx.geodatenzentrum.de/web_public/gdz/datenquellen/datenquellen_topplusopen.html
- Place names: © GeoBasis-DE / BKG (2026) for the nationwide GN250 name register and the administrative boundaries, plus the state register from the ATKIS Basis-DLM of the respective state (dl-de/by-2-0 or dl-de/zero-2-0).
- Tree species and watercourse width: ATKIS Basis-DLM via basemap.de, geodata of the state survey authorities (dl-de/by-2-0).
- Parcels: ALKIS of the respective state, © Geobasis NRW (dl-de/zero-2-0), © LGLN Niedersachsen (CC BY 4.0), © GeoBasis-DE/LGB (dl-de/by-2-0).
- Rescue points: © KWF-Rettungspunkte, Datenurheber, www.rettungspunkte-forst.de (CC BY-ND 4.0).
- Specialist maps: Bundesamt für Naturschutz (BfN) and Thünen-Institut under the German geodata access regulation (GeoNutzV), Bundesanstalt für Gewässerkunde (BfG) under CC BY 4.0.
- Weather: Quelle: Deutscher Wetterdienst (CC BY 4.0), fetched via Bright Sky.
- Paths, watercourses, buildings and small monuments: © OpenStreetMap contributors (ODbL 1.0), monuments additionally from Wikidata (CC0).